Back 4 Blood card list: best cards to use in your deck
Discover the best cards and deck in Back 4 Blood
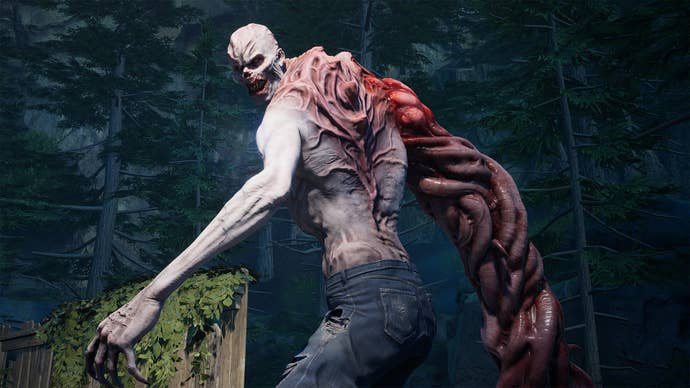

Want to find the best cards in Back 4 Blood? The swarms of Ridden are ridiculously powerful in Back 4 Blood, especially when you make the leap to the appropriately named Nightmare mode. If you want to survive, you’ll need to construct the best deck for your character. Whilst you should choose certain cards depending on your character and build, there are some cards that are undoubtedly worth using no matter which character you play with.
This guide will show you the 11 best cards in Back 4 Blood, so that you can quickly assemble a powerful deck and jump into the action.

Back 4 Blood best cards
There are over 150 cards in Back 4 Blood, and most of them are great. However, the best cards are those that will offer a significant advantage with few drawbacks. If you have empty slots in your deck, or you just want to know the best cards in the game, we've got you covered.
Ridden Slayer
Description: +20% Weakspot Damage.
When slaying zombies and the various Special Ridden in Back 4 Blood, damage really is the name of the game. With that in mind, Ridden Slayer slots perfectly into any deck. The 20% damage increase to weakspots is crucial when fighting mutations, especially if you are on Veteran or Nightmare difficulty. This is one of the first cards in our Walker build, which focuses on increasing damage as much as possible.
Broadside
Description: Precision Kills have a 20% chance to cause Ridden to explode, dealing 15 damage to other Ridden within 4 meters.
Explosives are pretty useful when fighting zombies, but Broadside lets you turn Ridden into the thing they fear most. Each time you kill a Ridden, Broadside gives it a 20% chance to explode, damaging all other nearby enemies. 20% might not seem very high, but it's really powerful when mowing down a horde. Check out our Jim build to see this card in action.
Marked For Death
Description: Mutations you ping are highlighted and your team deals 10% increased damage to highlighted enemies.
Just like the other cards above, Marked For Death increases your damage again. However, it also helps you mark Special Ridden for your teammates by highlighting them, which is necessary if you want to kill mutations before they attack and leave your team in an injured shambles. You can find Marked For Death in our Karlee build if you want to create a scout deck.
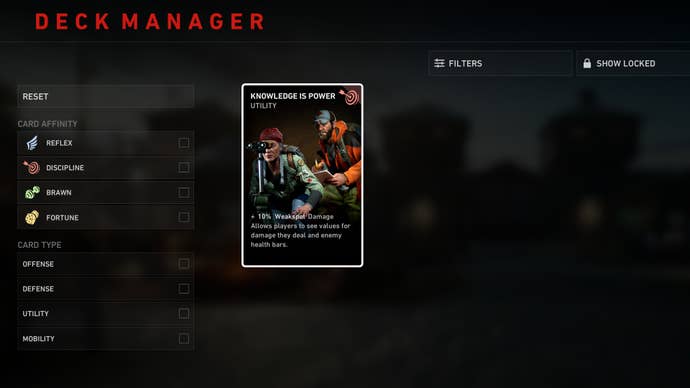
Knowledge Is Power
Description: +10% Weakspot damage. Allows players to see values for damage they deal and enemy health bars.
Okay, this is the last damage card. I promise. Other than the extra 10% weakspot damage, which you'll be grateful for when fighting an Ogre or a Hag, Knowledge Is Power allows you to see damage numbers and health bars on enemies, which helps you spot which weapons are worth using (and scratches the Destiny part of your brain). Watching those damage numbers fly around might also be the kick you need to start properly aiming for weakspots, as you'll be able to see just how much extra damage you can deal if you are precise.
Breakout
Description: Breakout: Hold E to free yourself from Grabs. +50% Breakout Cooldown Reduction (base 60 seconds).
Damage is very important, but you can't fight the Ridden if you are pinned to the ground. Whether you've been trapped by a Hocker's spit, or a Stalker has pounced from the shadows, you usually need a nearby teammate to free you. If your teammate is distracted with a horde or other Mutations, you'll take a lot of damage whilst waiting and could go down very quickly. Breakout gives you an easy escape in these situations, allowing you to wrestle out of the Ridden's grasp. This fits into most decks, but it's worth noting that Evangelo already has a similar ability. Check out our Evangelo build to see which cards you should use with him instead.
Lucky Pennies
Description: Whenever you or your team loots Copper, you have a 35% chance to find 35% additional Copper.
Whilst the other utility cards mentioned also focus on dealing increased damage, Lucky Pennies takes a different path. Copper is the currency you use to buy weapons, items, ammo, and team upgrades during a run. Back 4 Blood doesn’t give you first aid kits and weapons in every safe room for free like in Left 4 Dead, so if you want to live to fight another day, you’ll need as much copper as you can find. This card applies to your whole team, so you should always ensure that one player has it active.
Cross Trainers
Description: +20% Stamina and Stamina Regen +3% Move Speed + 5 Health.
Back 4 Blood is filled with frantic moments where sprinting is usually the best option. Whether you are running from a horde, or making the final dash to a safe room, extra stamina and stamina regen are crucial. With extra little boosts to move speed and health without a single negative, Cross Trainers really is one of the most valuable cards in Back 4 Blood.
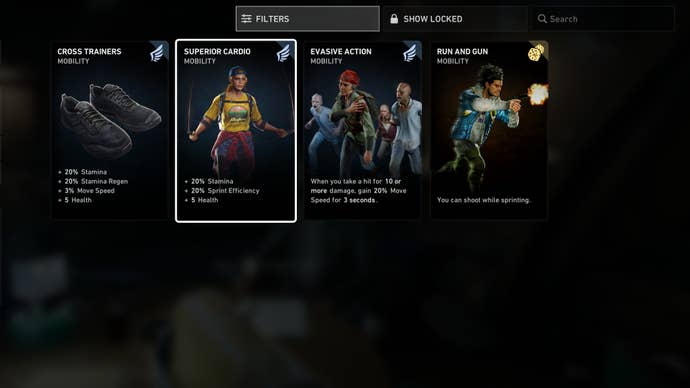
Superior Cardio
Description: +20% Stamina and Sprint Efficiency + 5 Health
If you want to increase your stamina even further, take Superior Cardio. Like Cross Trainers, this card has no negative effect, but you'll be able to run for longer and take another hit from Ridden. That could be the extra push you need to survive another level and unlock a new starting point on your run. Of course, our Holly and Evangelo builds both drastically improve stamina, but Superior Cardio and Cross Trainers are best for everyone, as they offer lots of bonuses and don't require a specific playstyle or build.
Run And Gun
Description: You can shoot while sprinting.
Speed is important, but that doesn't mean you should have to sacrifice your firepower. Sprinting usually leaves you defenseless in Back 4 Blood, but with Run And Gun equipped, you'll be able to charge towards a horde with guns blazing. This lets you protect yourself when you're dashing to the saferoom, giving you those epic action movie moments.
Inspiring Sacrifice
Description: When you or a teamate becomes incapaciteated, all teammates heal for 25 health over 20 seconds.
Inspiring Sacrifice makes the most of a rough patch, healing everyone by 25 health when someone on the team goes down. Like Lucky Pennies, this applies to everyone on the team, so only one person needs to have it equipped. To see Inspiring Sacrifice used in a support deck, take a look at our Mom build.
Charitable Soul
Description: Healing a teammate also applies 50% of the effect to you.
If you want to make the most of every bandage, Charitable Soul is one of the best defense cards around. Whenever you heal a teammate, this card applies 50% of the effect to you. This means you'll get healed every time you use a bandage or painkillers on a teammate. This will boost your health and help you save healing items, as you should be able to get by without needing to heal yourself. Just wait for a teammate to lose health, and then jump in to heal them and get some sweet health points back for yourself.
Full Back 4 Blood card list
If you're in need of a complete list of every card in Back 4 Blood, then look no further.
| Card Name | Card Affinity | Card Type | Card Effect |
|---|---|---|---|
| Cross Trainers | Reflex | Mobility | +20% Stamina, +20% Stamina Regen, +3% Move Speed, +5 Health |
| Energy Drink | Reflex | Mobility | +40% Stamina, -5% Damage Resistance |
| Rhythmic Breathing | Reflex | Mobility | +60% Stamina, -20% Slow Resistance |
| Reload Drills | Reflex | Offense | +20% Reload Speed |
| Widemouth Magwell | Reflex | Offense | +30% Reload Speed, -5% Damage Resistance |
| Mag Coupler | Reflex | Offense | +50% Reload Speed, disables Aim Down Sights |
| Slugger | Reflex | Offense | +5 Health, +10% Melee Stamina Efficiency, +20% Melee Attack Speed |
| Brazen | Reflex | Offense | +30% Melee Stamina Efficiency, +30% Melee Attack Speed, -5% Damage Resistance |
| Meth Head | Reflex | Offense | +40% Melee Attack Speed, +40% Melee Stamina Efficiency. Your Melee Attacks no longer stick in tough enemies. Disables Aim Down Sights |
| Ridden Slayer | Reflex | Offense | +20% Weakspot Damage |
| Reckless Strategy | Reflex | Offense | +30% Weakspot Damage, -5% Damage Resistance |
| Hyper-Focused | Reflex | Offense | +50% Weakspot Damage, -75% ADS Move Speed |
| Hi Vis Sights | Reflex | Offense | +30% Aim Speed |
| Tunnel Vision | Reflex | Offense | +50% Aim Speed, -5% Damage Resistance |
| Steady Aim | Reflex | Offense | +80% Aim Speed, -50% ADS Move Speed |
| Shooting Gloves | Reflex | Utility | +25% Weapon Swap Speed |
| Guns Out | Reflex | Utility | +50% Weapon Swap Speed, -5% Damage Resistance |
| Cocky | Reflex | Utility | +75% Weapon Swap Speed. When you take damage, your Accuracy is reduced by 20% for 3 seconds. |
| Smelling Salts | Reflex | Utility | +100% Revive Speed |
| Pep Talk | Reflex | Utility | +150% Revive Speed, -5% Damage Resistance |
| Rousing Speech | Reflex | Utility | +225% Revive Speed, +20% Team Reduced Incap Trauma. Disables Offensive Accessories |
| Dash | Reflex | Mobility | +5% Move Speed |
| Fleet Of Foot | Reflex | Mobility | +10% Move Speed, -5% Damage Resistance |
| Run Like Hell | Reflex | Mobility | +15% Move Speed. When you take damage, your Accuracy is reduced by 20% for 3 seconds. |
| Superior Cardio | Reflex | Mobility | +20% Stamina, +20% Sprint Efficiency, +5 Health |
| Olympic Sprinter | Reflex | Mobility | +30% Sprint Efficiency, -5% Damage Resistance |
| Reckless | Reflex | Mobility | +40% Sprint Efficiency. When you take damage while Sprinting, you lose all Stamina |
| Breakout | Reflex | Utility | Hold E to free yourself from Grabs. +50% Breakout Cooldown Reduction (Base 60 seconds) |
| Combat Medic | Reflex | Defense | +50% Use Speed. Heals teammates for an additional 20 Health when you revive them |
| Fire In The Hole! | Reflex | Mobility | When you throw an Offensive Accessory, gain 20 Temporary Health and 20% Move Speed for 5 seconds |
| Medical Expert | Reflex | Defense | +15% Healing Efficiency. When you use a Medical Accessory, you gain 15% Move Speed for 15 seconds |
| Rolling Thunder | Reflex | Mobility | +35% Move Speed while firing with Shotguns. +10% Damage with Shotguns |
| Speed Demon | Reflex | Mobility | +6% Move Speed while using an SMG. +35% Reload Speed while using an SMG |
| Hellfire | Reflex | Mobility | +45% Move Speed while firing. +5% Move Speed while not firing |
| Marathon Runner | Reflex | Mobility | No Movement Penalty for strafe and backpedal. Disables Sprint |
| Mandatory PT | Reflex | Mobility | +15% Team Stamina |
| Pep In Your Step | Reflex | Mobility | Precision Kills grant you 10% Move Speed for 5 seconds |
| Shredder | Reflex | Offense | Each bullet hit causes the target to take 1% increased damage for 3 seconds (stacks up to 15%) |
| Glass Cannon | Reflex | Offense | +25% Damage, -30% Health |
| Sadistic | Reflex | Offense | Gain 5% Weakspot Damage for each Precision Kill in the last 10 seconds |
| Evasive Action | Reflex | Mobility | When you take a hit for 10 or more damage, gain 20% Move Speed for 3 seconds |
| Adrenaline Fueled | Reflex | Offense | +100% Stamina, -75% Stamina Regeneration. When you kill an enemy, gain 10 Stamina instantly and an additional 10 Stamina over 5 seconds |
| Miraculous Recovery | Reflex | Defense | When you use a Medical Accessory, it has a 25% chance to have 100% increased effect |
| Screwdriver | Reflex | Utility | +50 Use Speed, +10% Stamina |
| Multitool | Reflex | Utility | +75% Use Speed, -5% Damage Resistance |
| Headband Magnifier | Reflex | Utility | +125% Use Speed. When you take damage, you have a chance to be blinded for 1 second |
| Utility Scavenger | Reflex | Utility | You can sense nearby Quick Accessories. More Quick Accessories spawn |
| Stimulants | Reflex | Mobility | Pain Meds you apply also grant +10% Move Speed, +10% Reload Speed, and +10% Weapon Swap Speed for 30 seconds |
| On Your Mark... | Reflex | Mobility | When you exit a starting saferoom your team gains +15% Move Speed for 30 seconds |
| Killer's Instinct | Reflex | Offense | +30% Weakspot Damage. Disables Aim Down Sights |
| Power Swap | Reflex | Offense | Changing weapons within 0.75 seconds of reaching low ammo grants +20% Damage for 5 seconds |
| Stock Pouch | Reflex | Offense | +30% Sniper Ammo Capacity. +10% Damage with Sniper Rifles |
| Mag Carrier | Reflex | Offense | +30% Pistol/SMG Ammo Capacity. +10% Damage with Pistols and SMGs |
| Mad Dash | Reflex | Mobility | +20% Sprint Speed, -30% Sprint Stamina Efficiency |
| Ammo Pouch | Discipline | Offense | +25% Ammo Capacity |
| Ammo Belt | Disciple | Offense | +50% Ammo Capacity, -20% Stamina Efficiency |
| Ammo Mule | Discipline | Offense | +75% Ammo Capacity. Disables Support Accessories |
| Front Sight Focus | Discipline | Offense | +20% Accuracy |
| Optics Enthusiast | Discipline | Offense | +30% Accuracy, -20% Stamina Efficiency |
| Quick Kill | Discipline | Offense | +50% Accuracy. Disables Aim Down Sights |
| Motorcycle Jacket | Disciple | Defense | +5% Damage Resistance, +5 Health |
| Padded Suit | Discipline | Defense | +10% Damage Resistance, +5 Health, -20% Stamina Efficiency |
| Motorcycle Helmet | Discipline | Defense | +15% Damage Resistance, +10 Health. Disables Aim Down Sights |
| Combat Training | Discipline | Offense | +5% Bullet Damage, +50% Bullet Penetration |
| Large Caliber Rounds | Discipline | Offense | +7.5% Bullet Damage, +100% Bullet Penetration, -20% Stamina Efficiency |
| Silver Bullets | Discipline | Offense | +10% Bullet Damage, +150% Bullet Penetration. When you kill a Mutation, you lose 5 Copper |
| Antibiotic Ointment | Discipline | Defense | +20% Healing Efficiency |
| EMT Bag | Discipline | Defense | +40% Healing Efficiency, -20% Stamina Efficiency |
| Field Surgeon | Discipline | Defense | +60% Healing Efficiency, -50% Use Speed |
| Energy Bar | Discipline | Mobility | +20% Stamina Efficiency, +5 Health |
| Cold Brew Coffee | Discipline | Mobility | +40% Stamina Regeneration, -10% Stamina Efficiency |
| Natural Sprinter | Discipline | Mobility | +100% Stamina Regeneration, -50% Maximum Stamina |
| Inspiring Sacrifice | Discipline | Defense | When you or a teammate becomes incapacitated, all teammates heal for 25 health over 20 seconds |
| Charitable Soul | Discipline | Defense | Healing a teammate also applies 50% of the same effect to you |
| Hunker Down | Discipline | Defense | While crouching, gain 10% Damage Resistance and 40% accuracy |
| Avenge The Fallen | Discipline | Offense | When you or a teammate becomes incapacitated, all teammates gain 30% Damage, 20% Reload Speed, and Unlimited Ammo for 10 seconds |
| Vanguard | Discipline | Defense | Melee kills grant 1 Temporary Health to you and nearby teammates |
| In The Zone | Discipline | Offense | Precision Kills grant 5% Reload Speed for 5 seconds (stacking up to 10 times) |
| Trigger Control | Discipline | Offense | +25% Accuracy with Assault Rifles and Sniper Rifles |
| Needs Of The Many | Discipline | Defense | -20% Health, +1 Team Extra Life |
| Combat Knife | Discipline | Offense | Turns your Bash into a Knife that counts as a Melee weapon |
| Meatgrinder | Discipline | Offense | Gain 30% Move Speed and Accuracy while crouched using an LMG |
| Scattergun Kills | Discipline | Offense | +40% Reload Speed with Shotguns |
| Controlled Movement | Discipline | Mobility | +40% Move Speed while aiming down sights with Sniper Rifles |
| Ammo For All | Discipline | Offense | +10% Team Ammo Capacity |
| Down In Front! | Discipline | Defense | While crouching you neither take nor deal Friendly Fire damage. +10 Health |
| Poultice | Discipline | Defense | When you use a Medical Accessory, the target heals for an additional 20 Health over 30 seconds |
| Group Therapy | Discipline | Defense | When you use a Medical Accessory, all teammates heal for 5 Health |
| Medical Professional | Discipline | Defense | First Aids and Defibrillators also recover 15 Trauma Damage and 1 Extra Life |
| Ammo Scavenger | Discipline | Utility | You can sense nearby Ammo. More Ammo spawns |
| Support Scavenger | Discipline | Utility | You can sense nearby Support Accessories. More Support Accessories spawn |
| Weapon Scavenger | Discipline | Utility | You can sense nearby weapons. More weapons spawn |
| Amped Up | Discipline | Defense | When you exit a starting saferoom, your team gains 50 Temporary Health |
| Patient Hunter | Discipline | Offense | Each second you Aim Down Sights increases your Damage by 10% (up to 3 stacks) |
| Power Reload | Discipline | Offense | Reloading a gun within 0.75 seconds of reaching low ammo will increase its magazine size by 30% until the next reload |
| Marked For Death | Discipline | Utility | Mutations you ping are highlighted and your team deals 10% increased damage to highlighted enemies |
| Knowledge Is Power | Discipline | Utility | +10% Weakspot Damage. Allows players to see values for damage they deal and enemy health bars |
| Tactical Vest | Discipline | Offense | +30% Rifle Ammo Capacity, +10% Damage with Assault Rifles and LMGs |
| Experienced EMT | Discipline | Defense | When you use a Medical Accessory, the target gains +20% Maximum Health until the end of the level |
| Vitamins | Brawn | Defense | +15 Health |
| Hydration Pack | Brawn | Defense | +25 Health, -15% Ammo Capacity |
| Canned Goods | Brawn | Defense | +40 Health, -30% Stamina |
| Batter Up | Brawn | Offense | +50% Melee Damage, +5 Health |
| Spiky Bits | Brawn | Offense | +25% Melee Damage+10% Damage Resistance while using a Melee Weapon, -15% Ammo Capacity |
| Mean Drunk | Brawn | Offense | +75% Melee Damage. Your Melee Attacks cause cleave through enemies dealing damage in a large area. Disables Sprint |
| Durable | Brawn | Defense | +15% Trauma Resistance, +5 Health |
| Body Armor | Brawn | Defense | +25% Trauma Resistance, -15% Ammo Capacity |
| Wooden Armor | Brawn | Defense | +40% Trauma Resistance, -100% Fire Resistance, -100% Acid Resistance, -100% Explosion Resistance |
| Grenade Training | Brawn | Offense | +25% Accessory Damage |
| Demolitions Expert | Brawn | Offense | +50% Accessory Damage, -15% Ammo Capacity |
| Improvised Explosives | Brawn | Offense | +75% Accessory Damage, -25% Swap Speed |
| Confident Killer | Brawn | Offense | When you or your team kills a Mutation gain 1% damage (up to 15%) until the end of the level |
| Heavy Hitter | Brawn | Offense | Melee hits against Weakspots deal +20% additional Stumble Damage |
| Ignore The Pain | Brawn | Defense | +20% Melee Damage against Mutations. When you deal Melee Damage to a Mutation gain 1 Temporary Health and recover 3 Stamina |
| Berserker | Brawn | Offense | Gain 10% Melee Damage, 10% Melee Speed, and 5% Move Speed for each Melee kill in the last 4 seconds |
| True Grit | Brawn | Defense | When you take a single hit for 15 or more damage, heal 8 Health over 5 seconds |
| Pyro | Brawn | Offense | +100% Fire damage. Kills with fire grant you 3 Temporary Health. You can sense flammable objects nearby |
| Bomb Squad | Brawn | Offense | +100% Explosive Damage, +35% Explosive Resistance |
| Scar Tissue | Brawn | Defense | Take 1 less damage from all Ridden |
| Battle Lust | Brawn | Defense | Melee Kills heal 2 Health |
| Line 'Em Up | Brawn | Offense | +100% Bullet Penetration with Assault Rifles |
| Face Your Fears | Brawn | Defense | Gain 3 Temporary Health whenever you kill a Ridden within 2 meters |
| Well Fed | Brawn | Defense | -20% Stamina Regen, +10 Team Health |
| Heavy Attack | Brawn | Offense | Charge: Hold LMB with Melee Weapons to burst forward. Charge attacks deal 100% increased damage |
| Sunder | Brawn | Offense | Melee hits cause the target to take 20% increased damage for 5 seconds |
| Overwatch | Brawn | Defense | Kills from greater than 15 meters grant 5 Temporary Health to teammates within 10 meters of the target |
| Fresh Bandage | Brawn | Defense | Heal 10 Trauma Damage at the start of each level |
| Two Is One And One Is None | Brawn | Offense | You can equip a Primary weapon in your Secondary slot. -25% Swap Speed |
| Offensive Scavenger | Brawn | Utility | You can sense nearby Offensive Accessories. More Offensive Accessories spawn |
| Chemical Courage | Brawn | Offense | Pain Meds you apply also grant +25% Damage for 60 seconds |
| Numb | Brawn | Defense | Gain 15% Damage Resistance while you have Temporary Health |
| Broadside | Brawn | Offense | Precision Kills have a 20% chance to cause Ridden to explode, dealing 15 damage to other Ridden within 4 meters |
| Buckshot Bruiser | Brawn | Defense | When using Shotguns, gain Temporary Health for each pellet that hits |
| Second Chance | Brawn | Defense | +1 Extra Life, +5 Health |
| Grenade Pouch | Fortune | Offense | +1 Offensive Inventory |
| Double Grenade Pouch | Fortune | Offense | +2 Offensive Inventory, -10% Damage Dealt |
| Surplus Pouches | Fortune | Offense | -10% Health, +1 Team Offensive Inventory |
| Fanny Pack | Fortune | Defense | +1 Support Inventory |
| Shoulder Bag | Fortune | Defense | +2 Support Inventory, -10% Damage Dealt |
| Box O' Bags | Fortune | Defense | -10% Health, +1 Team Support Inventory |
| Mugger | Fortune | Utility | Melee kills have a 2% chance to spawn ammo |
| Highwayman | Fortune | Utility | Pistol kills have a 2% chance to spawn ammo |
| Admin Reload | Fortune | Offense | When you stow your weapon, it reloads. -15% Ammo Capacity |
| Bounty Hunter | Fortune | Utility | When you kill a Mutation, gain 10 Copper (up to 300 per level) |
| Ammo Stash | Fortune | Offense | Your secondary weapons have unlimited ammo. Your secondary weapons reload 20% slower |
| Life Insurance | Fortune | Defense | +2 Extra Life. Lose 50 Copper at the start of each level |
| Wounded Animal | Fortune | Defense | Kills while at Critical Health recover over 1 Health |
| Compound Interest | Fortune | Utility | Gain 10% of your total Copper in each Saferoom |
| Lucky Pennies | Fortune | Utility | Whenever you or your team loots Copper, you have a 35% chance to find additional Copper |
| Money Grubbers | Fortune | Utility | Each time your team loots Copper, you gain 5 additional Copper, stacking up to 100 additional Copper |
| Run And Gun | Fortune | Mobility | You can shoot while sprinting |
| Copper Scavenger | Fortune | Utility | You can sense nearby Copper. More Copper Piles spawn |
| Share The Wealth | Fortune | Utility | Each teammate gains 100 bonus Copper at the start of each level |
| Shell Carrier | Fortune | Offense | +30% Shotgun Ammo Capacity, +10% Damage with Shotguns |
| Hazard Pay | Fortune | Utility | Gain 250 bonus Copper at the start of each level |
| Saferoom Recovery | Fortune | Defense | Your team heals 5 Trauma Damage and refills !0% Ammo the start of each level |
Regardless of which character and build you are using, the cards above will fit into almost any deck and provide a huge boost. If you are looking for more help surviving the Ridden hordes, check out our tips and tricks for surviving Nightmare mode! If you aren't sure how to get new cards in Back 4 Blood, take a look at our Supply Lines guide. If you want to try out different characters, take a look at our guide on how to unlock all of the cleaners in Back 4 Blood.