The Flare Path: Welcomes Combative Commenters
Are you ready to order?
Hefty, persuasive, and reeking of spruce-scented Eau de Ardennes, the new Bulge-themed Combat Mission unquestionably deserves a Flare Path After Action Report. The trouble is, after seven days of snowy slaughter, fraught forest probes and costly cottage clearing, I'm now in no fit state to shepherd Shermans or put plucky pixeltruppen in harm's way. Worn to a frazzle by delicate tactical decision-making and teeth-rattling mortar stonks, I've totally exhausted my capacity for command. There is a battle yarn waiting below the break, but to unspool it I'm going to need your help.

The Idea
Rather than riskrepeatingmyself I thought this week, for a change, I'd let you dispense the orders. There's probably a good reason why no-one has ever attempted play-by-comment communal Combat Mission-ing before, but here at Flare Path we've never let silly things like 'good reasons' stand in the way of an interesting, potentially entertaining experiment. Here, in outline, is how I envisage the world's first (?) PBC co-op turn-based wargaming session working.
I've selected a bijou Combat Mission: Final Blitzkrieg 'quick battle' map and populated that map with two small opposing armoured forces. Battlefront's AI will be left to choreograph the American AFVs while you, good Flareopaths will, I hope, attempt to guide the German ones to a famous victory. Every turn I'll describe the current tactical situation (utilizing pictures and a gridded map where necessary) and, via a comment, invite Axis orders from anyone – prior CM experience unnecessary - willing to get involved.

As orders will be accepted on a first-come-first-served basis and individual commenters are only allowed to 'move' one vehicle per turn, every turn will involve tactical input from multiple CCs (Comment Commanders). One turn Vintokryl68 might send the Tiger trundling northward towards grid square C41, while Hodges manoeuvres the halftrack and Nichtschießen does something sly with the Hetzer. During the next order round, SabotBrummel could end-up in charge of the Tiger while RATOG and Firecrest do the honours with the tank destroyer and Sd.Kfz. 250.
Once the orders are in for all vehicles, I'll execute them then return with a brief image-accompanied account of how the sixty seconds of in-game action played out. Did you manage to nail that Sherman loitering in the churchyard? Were you able to reverse your Panzer IV into the safety of that alley before those Hellcats pounced? It will all be revealed.
Fondness for things like family, food, and sleep means some turns are sure to be executed faster than others, but with a thirty turn time-limit, and a relatively compact map, I'm confident this historic multiplayer engagement will have reached a conclusion by the time next week's Flare Path heaves into view. Please pop in regularly to check on progress and lend a hand with the Panzer plotting.
The Challenge
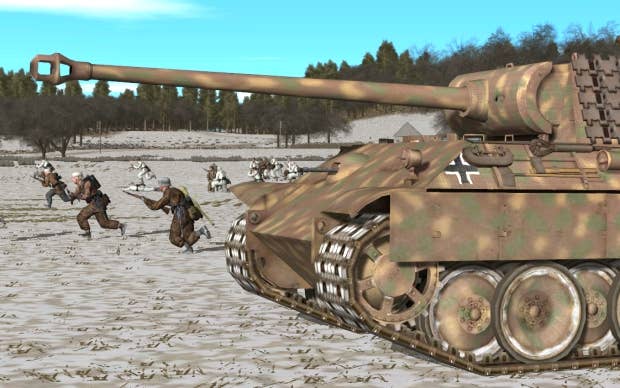
It's a cold clear day in late December, 1944. In the cobbled precincts of a deserted Belgian town the remnants of ravaged German and American armoured units are about to meet in mortal combat. The commenter-controlled Axis force consists of...

A mighty Tiger, sure to bead the brow and knot the guts of any US tanker that encounters it.

A squat Hetzer tank destroyer. Though not nearly as well armed or armoured as the Tiger, this ambush hunter is more than capable of stopping standard Shermans in their tracks.

A capable but callow Panzer IV J (late). Unlike its comrades-in-armour, this medium tank is crewed by a 'green' rather than a 'regular' crew. Will that inexperience tell in the fighting to come? Only time will tell.

A vulnerable but relatively swift Sonderkraftfahrzeug 250. Be aware that this halftrack currently contains your highest ranking unit, a three-man disembarkable Forward Observer HQ sadly without access to arty or air support in this skirmish but equipped with radio and three pairs of potentially useful Mk. I eyeballs.
Fleeting glimpses of approaching enemy units suggest the American force is a little larger than ours and includes Shermans (variant unknown) and tank destroyers (type unknown). Wipe out the US armour to secure victory.
The Venue

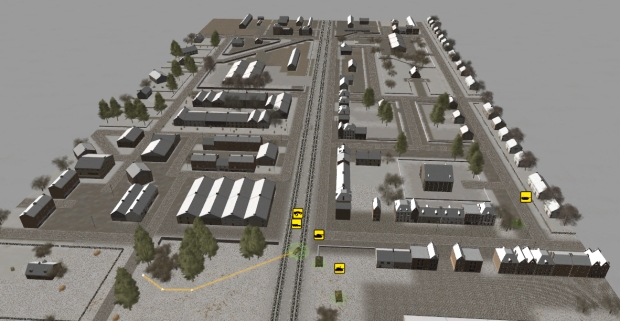
(Click map to enlarge)
The four German AFVs begin turn #1 sheltering in a square in the NE corner of the urban arena (Tiger g54, Panzer IV g55, Hetzer j54, Halftrack j55) while the US ones lurk unseen in the SW corner. The extensive undamaged road network means getting around quickly on this hill-free map won't be a problem (Flat-out even the tardy Tiger could drive the length of the venue in a couple of turns/minutes). For the two turreted Panzers shortcuts through the numerous garden and yard walls (thin brown and grey lines) are practical. The halftrack and Hetzer will happily trundle through fences (orange lines) and previously breached walls but won't barge through brick or stone barriers.

Looking NW

Looking N (centre of map)

Looking S (centre of map)

Looking SE

Running longitudinally through the centre of the town is a perfectly straight two-track railway line that affords unobstructed views all the way to the western map edge (naturally these views are reciprocal so be careful!). Elsewhere sight-lines are generally dictated by buildings and, sometimes, trees, the majority of walls on the map being of the low variety.
Issuing Orders
Your order instructions can be as brief or as detailed as you like. A simple “Order Tiger to drive down road to grid square gg40” is just as acceptable as a fancy command specifying multiple waypoints, a movement speed/type, and a cover arc direction.
CM ingénues that wish to nuance their commands should bear in mind that 'hunt' is the most cautious of the movement forms. A tank ordered to 'hunt' to a destination will proceed slowly and extremely vigilantly stopping to engage the first enemy it spots. 'Move' stresses momentum but still means a tank will engage and evade of its own volition if it feels the need. A vehicle ordered to move 'quick' or 'fast' will prioritise reaching its destination over swapping shells with foes.

Cover arcs are a way of focusing a unit's attention in a particular direction during movement or an ambush. The Panzer IV in the screenshot above will keep its main gun pointed southward (the right-hand side of the pic) as it moves out of the courtyard and heads north then west. Using arcs is by no means essential but if you suspect you're being flanked or are concerned about a particular side-road on a route, they can be lifesavers.

It's unlikely you'll need to give specific targeting instruction during the engagement (Battlefront's excellent TacAI can usually be relied upon to choose the best target, re-orientate a vehicle to maximize armour benefits etc.). What you could conceivably find yourself doing is ordering a smoke shell shot. Both the Hetzer and the Panzer IV carry small stocks of smoke projectiles.
There's a good chance, especially with longer multi-stage order sequences, that some actions won't be completed within the scope of one sixty-second turn. If this occurs then the person guiding the vehicle during the next turn, may order any outstanding orders deleted or tag new orders to the end of existing ones.
If you've any questions about 'rules' or map features, ask away. The Tiger, Hetzer, Panzer IV and halftrack are nervously awaiting your instructions. Good luck and good hunting, gallant Flareopaths.
Turn 1. The Panzer IV and Tiger have successfully relocated to new positions beside the railway. The Hetzer is on the right of the pic looking westward down the long east-west road. The HQ halftrack is in the process of crossing the railway. No sign of the enemy yet.

Turn 2. The Tigers bold advance alongside the railway is uneventful. The cagier Hetzer moves to a new position with views of the church to the W. The halftrack arrives at aa55 (bottom-left of pic) without incident. Seemingly confused by a lack of waypoints (I issued only one, the destination, allowing the tank to choose its own route) the unbuttoned Panzer IV (bottom right of pic) backtracks apparently intending to approach m39 from the NE. Still no sign of the enemy.


Turn 3. Within seconds of unbuttoning, the Tiger has spotted a Stuart halted in the SW (top left in the pic above) corner of the map. Shots are traded. A Sherman appearing beside the Stuart joins in the exchange. In a furious 60 seconds the Tiger is hit five or six times (turret front x2, weapon mount x2, weapon...). One hit causes spalling which injures the commander. The other impacts seem to cause no ill effects. It's hard to assess the damage wrought by the outgoing 88m rounds but going by the sounds and a red cross that appears briefly over the Sherman, I believe the Tiger scored at least one penetrating hit. As the turn draws to a close both the Stuart and Sherman pop smoke, reverse and disappear from view. Elsewhere, the Hetzer arrives in its position, a position screened by several buildings from the US armour apparently concentrated in the SW. Moving through the courtyard previously occupied by the Hetzer, the Panzer IV is still approximately 20-30 seconds from its next destination (o41, just around the corner from the Tiger). Meanwhile, the HQ is a short dash from the groundfloor of a three-storey building across the railway from the Tiger.

Turn 4. Let's start with the good news. During turn 4 the Germans lost no AFVs and sustained no casualties. The bad news, the very bad news, is that our Tiger came under sustained fire from multiple US tanks including what looked like a 76mm Sherman 'Easy Eight' and now sports a useless main gun. Two of the Tiger's tormentors, the Easy Eight plus a bog-standard M4(?) , now appear to be heading N towards the railway. From its new 1st floor eerie the HQ can see several thus far unidentified AFVs and an infantry unit (crew?) in the SW corner of the map. The advancing Hetzer and Panzer IV are still totally unsighted but are approaching positions where they may have LOS to targets if the enemy tanks keep heading N. The pics below indicate possible LOF.

Hetzer

Panzer IV

Turn 5. The patient Hetzer is no more and I feel partially responsible. As it trundled into position next to the church it was hit by two shells hurled by an undetected foe in the SW. The first shell ricocheted skyward, the second punched a neat hole through the TD's front armour. The killer appears to have been the AFV arrowed in the pic below. It was firing over the intervening high wall something I didn't think was possible.

Thankfully the turn wasn't a complete disaster. Moments after the Hetzer perished, the Panzer IV made use of its new vantage point to kill an M3 halftrack that was heading in the direction of the church.
The wounded Tiger is now tucked in the alley at o38 while the three-man HQ on the other side of the tracks is just settling into new digs overlooking the US positions in the SW corner. Hopefully, they'll make some useful observations in the next turn.

Turn 6. Some interesting developments. From its lofty perch at dd33/34 the HQ seems to have a pretty good view of the yard in the SW corner of the map. About midway through the turn a Stuart and what looked to be a two-man AT team was observed exiting the yard and heading N. Now the only occupants of the yard seem to be a destroyed M10 tank destroyer (slain by the Tiger during turn 3?) and a few scattered crewmen.

Spasmodic unidentified AFV contacts on the railway suggest US armour is gathering there, possibly with the intention of moving off E or N.

During the turn the Panzer IV backed into the lee of the house at k/l34 where it was joined by the buttoned Tiger. It looks to be in a good position to tackle anything moving E along the railway or N past the wreck of the M3 halftrack.

Turn 7. In order to get the halftrack to z29, a little improvisation/interpretation was required. I chose to route the vehicle via the courtyard entrance in the SW rather than the one beside the railway. The turn ended with the halftrack about to swing right into a road with LOS to the railway and a possible US AFV.

On the other side of the tracks things were quiet until, in the closing seconds, a three-man US infantry team toting a bazooka and a radio came into view close to the M3. The team appears unaware of the German armour watching it from the east.

Turn 8. Shelled by the Panzer IV (which opened fire of its own accord) and machine-gunned by the Tiger, the 'AT team' attempted a retreat. I think all three were cut down as they ran.

I could be wrong but I think I heard a US AFV moving towards the M3 wreck from the railway in the closing seconds of the turn. Potential prey for the Panzer IV?
The Hetzer team are 30 seconds away from a promising observation position in the second storey of the house at h16.
The halftrack is now a stone's throw from the yard in the SW corner, but sees no targets (a consequence of its skeleton one-man crew?).

Turn 9. The surviving Hetzer crewmen have just suffered the same fate as their mount. They were spotted at the windows of the house at h16 and mercilessly pummelled by the US armour lurking near the railway. Before they perished they clocked the following scene...

There are at least three US AFVs on the northern side of the railway. A 76mm Sherman (behind the wall, top-centre), a Stuart (amongst the trees) and a 76mm TD (on the road and, like the Stuart, facing N). The buildings in the foreground mean none of the trio can be seen by the Panzer IV (k34) or the Tiger (j35).
On the south side of the track, the HQ team are still making their way to their new OP.

Possible fourth AFV nr railway?

Turn 10. Yep. There are four US tanks loitering north of the railway crossing.

Turn 11. Gosh, that was an exciting sixty seconds.
The key events:
+27 seconds. Disobeying the 'hold your fire' target arc, the HQ team's rifleman decides to have a pop at the closest Sherman. Madness!
+31 seconds. Pushing forward with the Tiger, the Panzer IV spots this same, now distracted Sherman and jams on its brakes.
+35 seconds. The Panzer IV fires. A lower front hull hit and a penetration!
+38 seconds. The perforated Sherman replies. Ricochet. No penetration. No damage.

+41 seconds. The Tiger, still advancing, takes a canister round in the flank. It looks like the round emanated from the Stuart.

+44 seconds. South of the railway, the decoy is hit and KOed by the Easy Eight behind the wall.

+46 seconds. The penetrated Sherman pops smoke and begins reversing.
+47 seconds. And, hosed by the Tiger's MGs, so does the Easy Eight!
+60 seconds. It looks like the M10 is about to spit an HE round at the HQ team.


Turn 12. Real heart-in-the-mouth stuff.
Five seconds in, the reversing Tiger loses a chunk of Zimmerit to a 37mm AP round fired by the Stuart. Two seconds later, the M10 drives into view close to the M3 halftrack. It's bringing its gun to bear on the Panzer IV when a 75mm shell tears through its weapon mount. The damage clearly isn't terminal because the TD immediately goes into reverse. By the end of the turn it has disappeared back into the growing smoke clouds seeded last turn.


Meanwhile, south of the tracks, the HQ's flight goes without a hitch.
Turn 13. Unlucky for some.
Another gripping turn.
+27 seconds. Moments after arriving back at k34 in the company of its pal, the unbuttoned Panzer IV spots a Sherman at 11 o'clock on the south side of the railway (the Sherman hit and penetrated on turn 11?).
+32 seconds. The Panzer fires.

+33 seconds. Bullseye! A front turret penetration!
+44 seconds. A second shell is dispatched. This one strikes the wall in front of the target.
+47 seconds. Blimey. Hydrogene's premonition of flanking proves eerily accurate. The Easy Eight is speeding east along the railway tracks.

Before the Panzer IV can engage, the US bruiser has disappeared from view.
+53 seconds. The Easy Eight was slowing and turning its turret anti-clockwise as it vanished. It seemed to be aware of our pair.
+59 seconds. The Panzer can't resist a third shot at the penetrated and seemingly lifeless Sherman south of the crossing. The round passes harmlessly over the turret top, slamming into the façade behind.
+60 seconds. The HQ is a few steps from the doorway of the house at v34. Once inside and upstairs it should have a grandstand view of the currently out-of-sight Easy Eight.


Turn 14. Ignoring my 'pop smoke' order (not sure why), the Panzer IV relocates to o41. No targets in view from this position at the moment. The tardier Tiger is still heading south to join its companion when the turn ends.

From v43 the HQ team have a fine view of the railway and its denizens. The Easy Eight is stopped near s23 facing E. The Stuart is still lurking under the trees by the crossing pointed NE. The AFV beside the wall on the left of the pic above is (I assume) the M10 damaged during the duel in turn 12.
Turn 15. I'm not sure my heart will take too much more of this.
+9 seconds. On 'road 41' the Tiger's southward progress is abruptly checked by a shell impact. A weapon mount hit. Partial penetration. Halted last turn the Easy Eight has decided to hunt along the rail lines. Glimpsing the buttoned German behemoth through a narrow keyhole, it has engaged and scored a palpable hit.

+18 seconds. The stunned Tiger is hit again. This time the shell punches straight through the front hull armour. Hatches fly open. Crewmen in mottled uniforms tumble onto the cobbles.

+30 seconds. Still moving E the Easy Eight catches sight of the Panzer IV reversing past the abandoned Tiger. For a few excruciating seconds the Panzer IV's fate seems sealed. But no. The forward momentum of the Allied vehicle and the backward momentum of the Axis one conspire to cheat the Easy Eight of a second kill. The Panzer disappears behind the house at d39.
+50. From their roost south of the railway, the HQ team watch as the Easy Eight pivots to port and begins making for the entrance to 'road 31'. Gulp. It looks like it's going after our Panzerkampfwagen.

Blue lines = likely Easy Eight movement routes
In its current position the Panzer IV appears not to have LOS/LOF between buildings A and B.

Turn 16. Not for the first time (see turn 14) the Panzer IV decides to ignore a smoke instruction. It starts towards i38 without smoke shelling the spot first as requested.*

*This was a LoS issue. See comments.

Ten seconds into its journey, our surviving AFV spots something squat, olive drab, and angular approaching at speed on the road by the church. It halts with the intention of firing but is unable to align its 75mm KwK 40 L/48 main gun before the beetling M10 disappears behind trees at the E end of the road. Will the TD reappear? No. It seems to have stopped out of sight of both the Panzer IV and the HQ in the vicinity of l30.

The Easy Eight is no longer alone.

And, as a consequence, the LoS picture is somewhat complicated.
The above is my very crude estimate of what the Easy Eight and M10 can see from their current positions. Green = Easy Eight forward field of view. Red = M10 forward field of view.
Turn 17. Little to report. The Panzer IV is now tucked behind the house at d39 facing west. The Easy Eight and M10 sit tight at o/p30 and l29 .


Turn 18. The Panzer IV manoeuvred without incident. No LoS to either of the US AFVs from the new position.

At the thirty second mark, the Tiger crew came under SMG fire from a knot of tankless US tankies. Heading east the ersatz GIs had just crossed the road close to the stationary Easy Eight. The pistol-armed Tiger crew emerged unscathed from the attack and are now ready to take orders from a Comment Commander.

What next? Your guess is as good as mine.
Turn 19. Breathe, Tim. Breeeeathe.
Holy Hafthohlladung, that was thrilling.

A reminder for those that missed the last batch of order comments. In turn 19 while the Tiger crew attempt to crawl south to the safety of a nearby house, our last AFV, a plucky/lucky Panzer IV, is planning to quit its hiding place and go face the Easy Eight and the M10 TD that are waiting a stone's throw apart on 'road 31' to the west.
An attention-focussing 'target armour' arc in place, the big red GUI button is pressed and the frozen battle instantly thaws.
+21 seconds. Creeping westward the Panzer IV catches sight of the Easy Eight down by the railway.

+25 seconds. After a slight twitch of the turret, a shell screams southward. The round hits the Sherman variant on the weapon mount and refuses to stop. 'PENETRATION'. Perfect.
+34 seconds. Are we going to get something in return? It seems not. After a nailbiting nine second wait (What are our chaps up to in there?) the Easy Eight is rocked by a second impact. This time the AP round enters the turret, instantly setting the American machine ablaze.

+55 seconds. Meanwhile, on the road next to the church, the M10 is all a fluster. Having popped smoke, it's reversing in a south-easterly direction. What is he up to? He's ours, surely.

+60 seconds. Even our Tiger crew seemed to be leading charmed lives this turn. In another twenty seconds all four of them should be safe and sound inside the house at n39.

Turn 20. Victory in reach?
No miracles from the M10. The AP round that finished it off had enough energy left after completing its dark deed to burst back into the light, bounce off the building at 028, recross the road beside the church, and embed itself in the wall of the house where the Hetzer crew perished.

In theory all that now stands between us and an unlikely triumph, is the two American AFVs parked either side of the railway crossing at the western end of the map.
A = damaged Sherman? (see turn 13)
B = Stuart

Turn 21. High noon.
As the Tiger crew bundle through the door of the shop at p40, pistol shots ring out. Our rattled recon team is being fired at from the S side of the railway by two prone American tankies! Don’t worry lads, at that range those trigger-happy clowns haven’t a hope of…

Ah.
The Tiger crew have a close-range target arc to ensure stealthy observation, but that's forgotten in the heat of the moment. Two clusters of unhorsed tankmen are now trading pistol shots across the broad expanse of the railway tracks. From a high window at u43, the German HQ team, still undecided about moving west themselves, look on flabbergasted.

Things are quieter on the northern periphery of the map. The prowling Panzer IV's journey west to c11 is entirely drama free. The tank stops a few metres from a left turn that, if taken, could produce a confrontation with a cowardly/coy Stuart.

Turn 22. Here we go round the mulberry bush.
Turn 22 from the perspective of our gunslinging Tigermen:
+5 seconds. Revenge. A US tanker endeavouring to cross the tracks and join his pals is stopped by a flurry of Walther P38 slugs.

Turn 22 from the perspective of our predatory Panzer IV:
+30 seconds. Rounding the corner, the hunting PzKpfw IV finds a wounded M4 slap-bang in the centre of its 'target armor' arc. Moments later the Ronson is burning brightly.

Turn 22 from the perspective of our eagle-eyed HQ team:
+13 seconds. Interesting. It looks like that sedentary Stuart is finally making a move. Yep, here it comes, haring down the tracks. Where on earth is it headed?
+40 seconds. Ah. It's hanging a left at the Easy Eight. If it keeps heading N we'll lose sight of it. (The Stuart keeps heading N)

Stuart last seen at 031.
Turn 23. I spy with my little eye something beginning with 's'.

The HQ's move proves useful. From the third storey of the property at w42 they spot the remaining - we assume - US AFV. The Stuart is stationary and facing E - not the way you want to be facing when a Panzer IV is approaching at pace from the NNW.

In 10-15 seconds, assuming its orders remain unchanged, the PzKpfw IV will round the east end of the church.
Turn 24. And then there were none.

When our 25 tonne grim reaper swung into the churchyard and clocked its quarry, that quarry was desperately trying to make itself scarce. With its arse-end pointed directly at the Panzer, the skittish Stuart didn't stand a chance. One round stopped it in its tracks. A second turned it into a crackling funeral pyre. I don't think anyone got out alive.

Dabbing the 'end turn' button I half expected to see the victory screen, but it seems our silicon adversary still has a bit of fight left in him. Perhaps if we give the tank crewmen dotted about the railway tracks, and the yards in the SW, a little taste of bow MG the chump will realise the game is up.


Turn 25. Pinch yourself.
Mop up along the railway line. Use road i to rejoin the HQ. Be careful - it's not impossible a bazooka team is still at large... In plotting the Panzer IV's orders for turn 25 I attempted to reflect the concerns and wishes of several Comment Commanders rather than just one.

As it turned out, a tentative pause-punctuated run to the western map edge wasn't necessary. Apart from a single long-range pistol shot fired at our unbuttoned Panzer TC as he passed junction i31 the turn passed without violence, the Americans surrendering at the close.

Pat yourself on the back. We secured a 'Major Victory' (1000pts to 328pts)!
During five days twenty-five minutes of bitter, surprise-sprinkled scrapping we lost four men and three AFVs. The Americans suffered twenty-one casualties and left five tanks and one halftrack smouldering on the pavements and street corners of 'Unnamed Belgian Town With Unusually Short Street Lamps'.

Post-battle stats confirm the obvious. Our 'green' Panzer IV performed brilliantly. By tomorrow, assuming one of the crewmen can scrounge a pot of white paint, that barrel will boast another five kill rings.

As suspected the Tiger's only scalp was the M10 slain in the yard in the SW on turn 3. Of course what the numbers don't show, is the important role our Panzerkampfwagen VI played in distracting attention from its little brother during the tense skirmishing around the church (see turn 11).

A Tiger-sized thank you to everyone that has issued orders, offered advice, or simply cheered from the sidelines since Friday. Without your thoughtful and enthusiastic contributions this experiment in communal Combat Mission would have failed dismally, and Flare Path's AAR archive would now be much poorer.
* * * * *