All 12 Avowed Treasure Map locations and rewards
Here's a detailed breakdown of all 12 Treasure Map locations in Avowed


Trying to find the treasures hidden within each of Avowed's Treasure Maps?Avowed has 12 Treasure Maps hidden within its four main regions that are wonderfully unique. Instead of telling you exactly where to go via a map marker, you'll pick up pages that show illustrated scenery. You then have to travel the world and find the exact spot that was drawn.
For anyone who delights in not being handheld, Avowed's Treasure Maps will be great fun. All others might find them highly obfuscating, but that's where we can provide some assistance. In this guide we'll outline the exact location of each Treasure Map and how to find the treasures that the maps lead to. Happy hunting!
All Avowed Treasure Maps
Here are all 12 Treasure Maps scattered across Avowed's four main regions. Click on the treasure you're searching for to jump to that section of the guide.
Dawnshore Treasure MapsEmerald Stair Treasure MapsShatterscarp Treasure MapsGalawain's Tusks Treasure MapsTo help you find them all, we've also included an interactive map of all the treasure map locations, from our friends at MapGenie:
Treasure Map locations
Finding these Treasure Maps is sometimes very easy, only requiring you to chat with a seller in town. But in a few instances, locating the map requires just as much searching as finding the treasure itself. Here's a gallery with quick references for all Treasure Map locations. Check the 'Treasure Map location' section in each entry below for greater details.
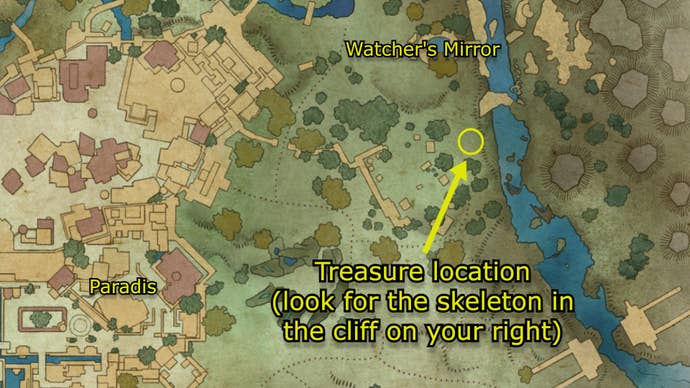
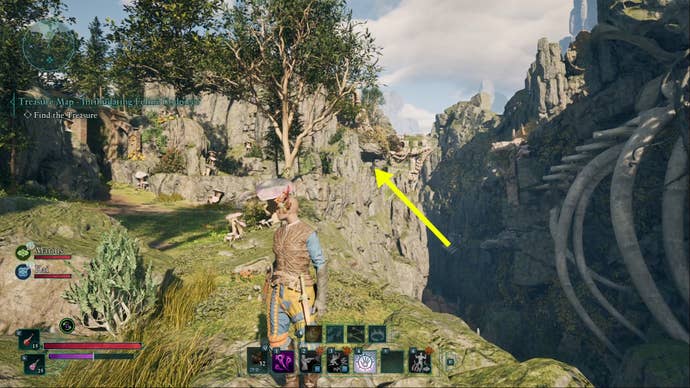
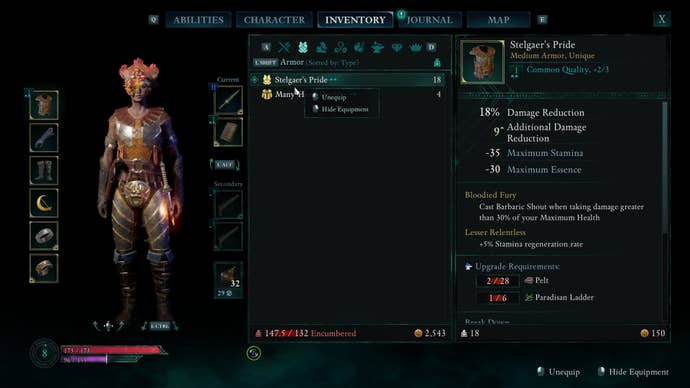
1. Dawnshore Treasure Map: Intimidating Feline Codpiece
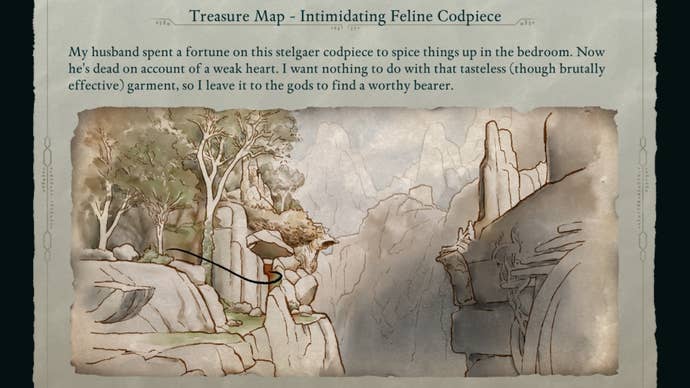
Treasure Map location: This map is sold by Lynna, the owner of The Best Offense in Claviger's Landing. She's the first armour merchant you'll run into in Avowed.
Treasure location: Go east of Paradis and south of the Watcher's Mirror point of interest until you come to a cliffside with a giant dinosaur-esque skeleton sticking out of it. Walk along the side of the cliff until you reach an enclave with a breakable wall; the treasure lies within a chest inside.
Treasure: Stelgaer's Pride, a unique medium armour chestpiece that lets you cast Barbaric Shout when taking damage greater than 30% of your max health and offers a boost to Stamina regeneration. This is a good armour for anyone who mostly does melee combat.
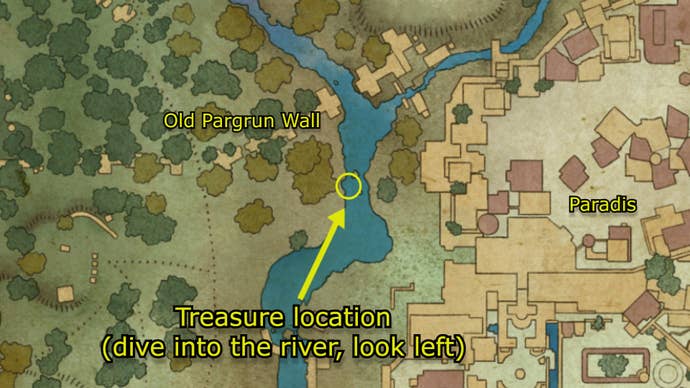
2. Dawnshore Treasure Map: Captain Henqua's Spoils
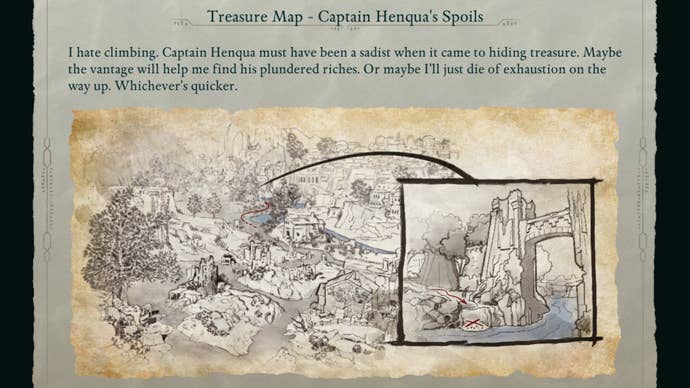
Treasure Map location: Climb the Lighthouse near Claviger's Landing. All the way at the top, you'll find a body with the Treasure Map.
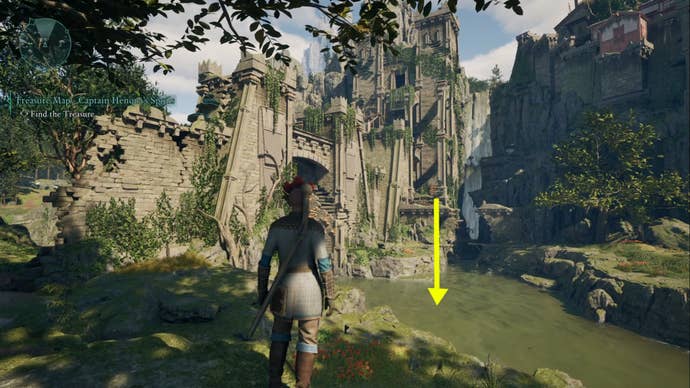
Treasure location: Head to the Old Pargrun Wall and dive into the river near the shore. If you're facing the structure that overlooks the river, veer left underwater until you see a small cave. There's a chest hidden there, along with the shield you're looking for.
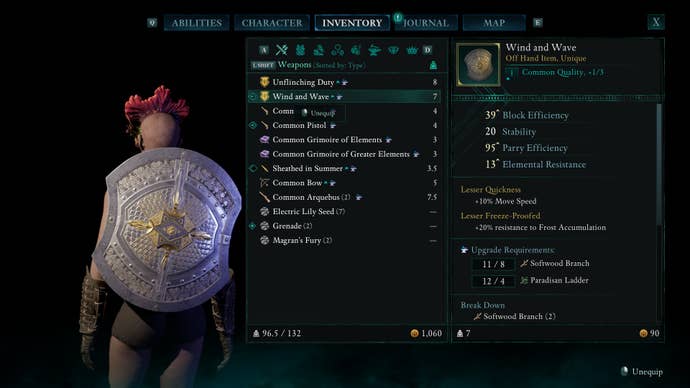
Treasure: Wind and Wave, a unique shield that provides a boost to move speed and resistance against Frost accumulation. This is a fine starting shield for anyone investing in the Fighter's abilities, though there are much better options later on.
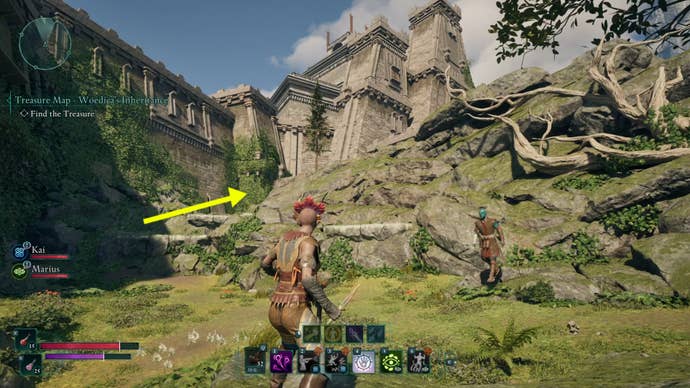
3. Dawnshore Treasure Map: Woedica's Inheritance
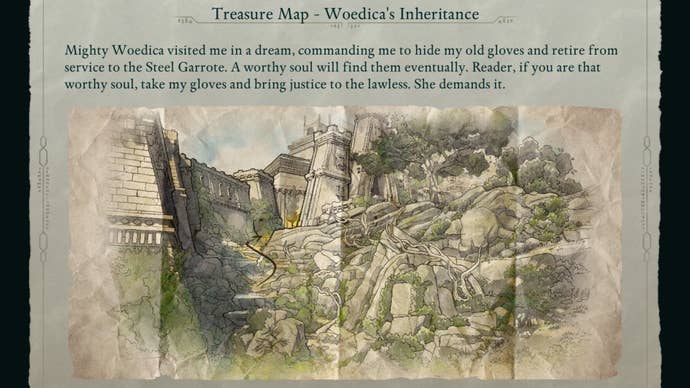
Treasure Map location: This map is sold by Sanza in his shop Sanza's Emporium, located in Paradis Hightown just southeast of the High Market.
Treasure location: Head over to the outer eastern wall of Paradis until the gate lines up to the illustration on the treasure map. Go along the wall until you reach a dead end and very carefully search for a hidden switch on your right. Hit the switch and part of the wall will slide open to reveal a hidden room.
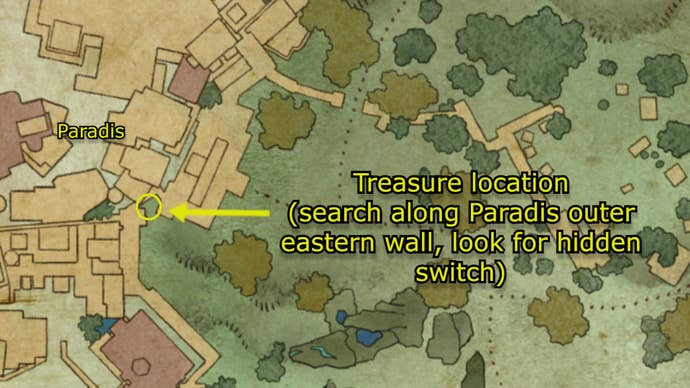
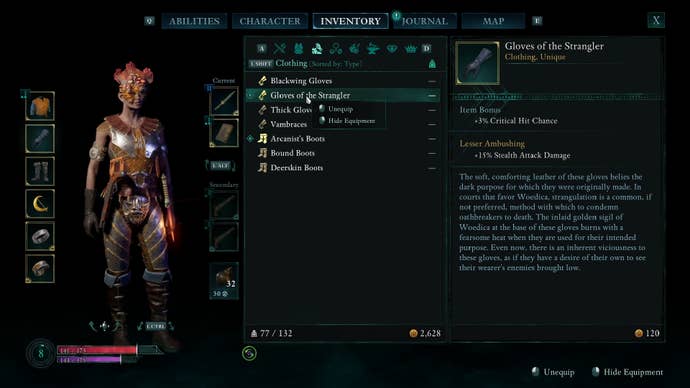
Treasure: Gloves of the Strangler, a unique pair of gloves that increases critical hit chance and stealth attack damage. For Rangers and other characters of a sneaky persuasion, these are excellent.
4. Emerald Stair Treasure Map: Practical Pockets
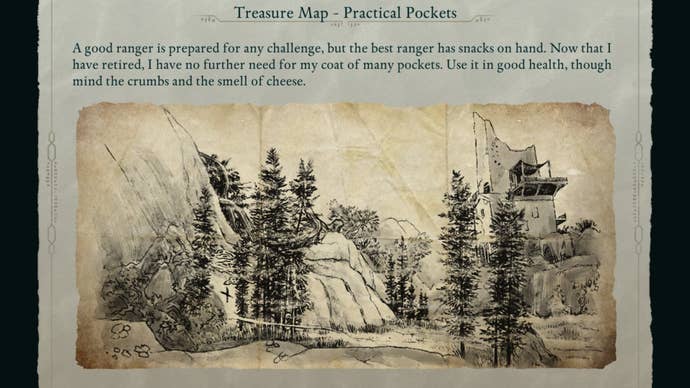
Treasure Map location: Sold by Ector Brewer in The Gifted Magpie teahouse in Fior mes Iverno.
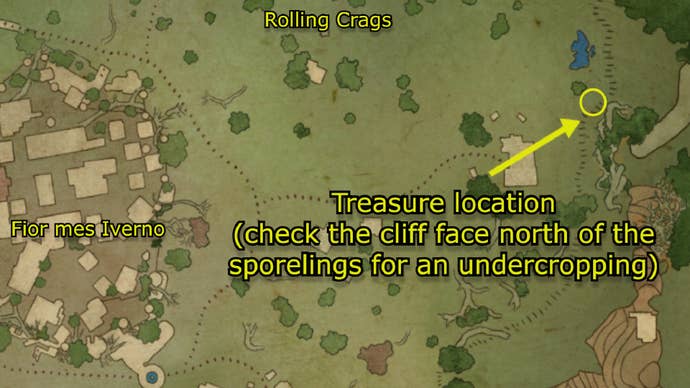
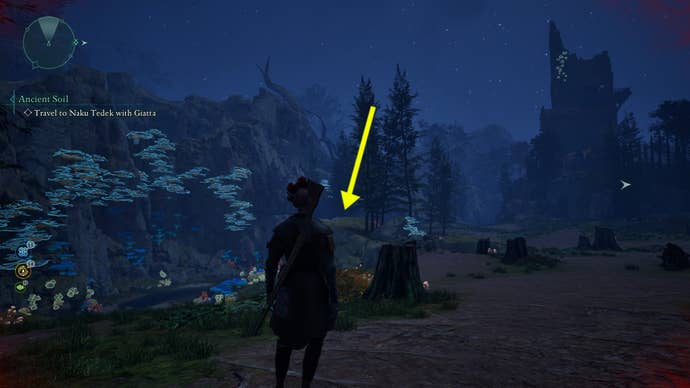
Treasure location: Head northeast of Fior mes Iverno, southeast of Rolling Crags. Face the tower in the illustration then explore the cliffside north of the mushroom patch with the sporelings and bear. You'll find a small undercropping of ground along the cliff face with a chest hidden there.
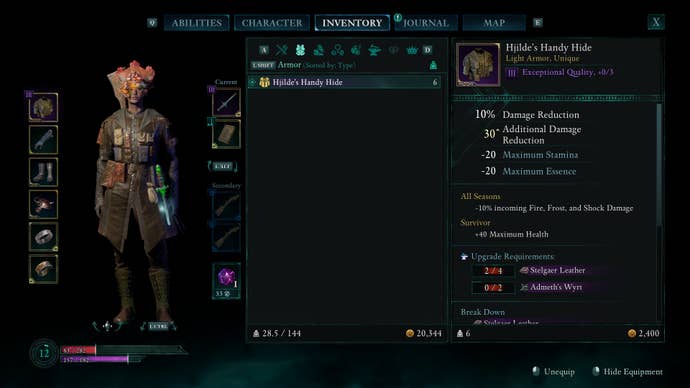
Treasure: Hjilde's Handy Hide, a unique light armour chestpiece that adds +40 to max health and reduces all incoming Fire, Frost, and Shock damage. A stellar coat that complements a build making use of Ranger abilities, not to mention one of the earliest Exceptional Quality armours you can get.
5. Emerald Stair Treasure Map: Painter's Regret
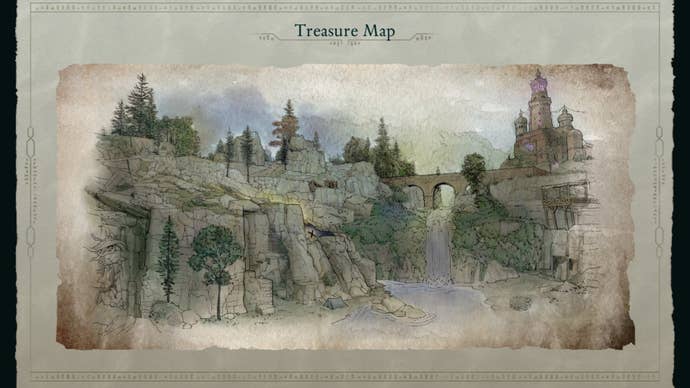
Treasure Map location: Explore the southeast of Emerald Stair until you reach Maxim's Claim Party Camp, which is slightly to the northeast of Elia's Revenant Farm on your map. An empty house can be found to the north of this camp. Explore it and examine the painter's canvas.
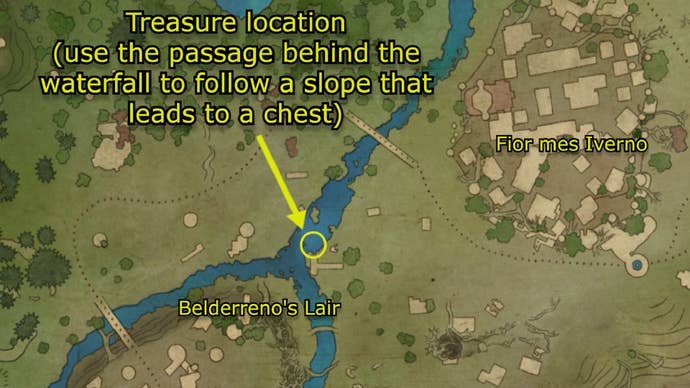
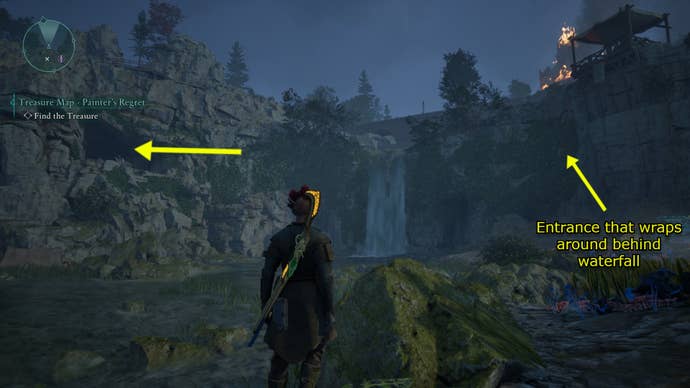
Treasure location: Go west of Fior mes Iverno until you come across a bridge. In the river beneath the bridge (above the Belderreno's Lair marker on your map) is a waterfall that matches the treasure map illustration. You have two options here if you're facing the waterfall - you can either parkour up the left stretch of rocky wall, jump over a gap and go up a slope until you reach an alcove with the treasure, or you can take the long way around via a passageway that wraps behind the waterfall.
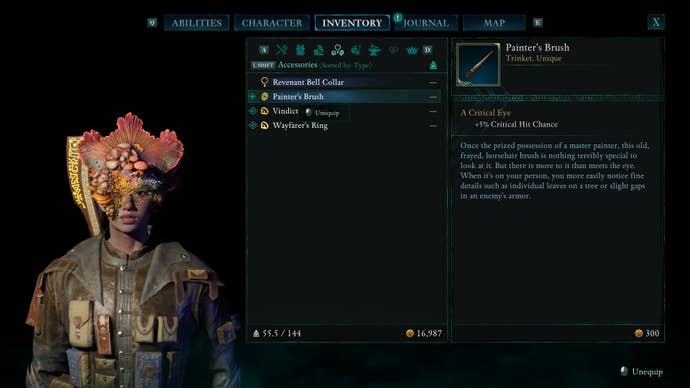
Treasure: Painter's Brush, a unique trinket that gives you a +5% critical hit chance. Good for anyone developing a build that relies on high damage.
6. Emerald Stair Treasure Map: Earthly Aegis
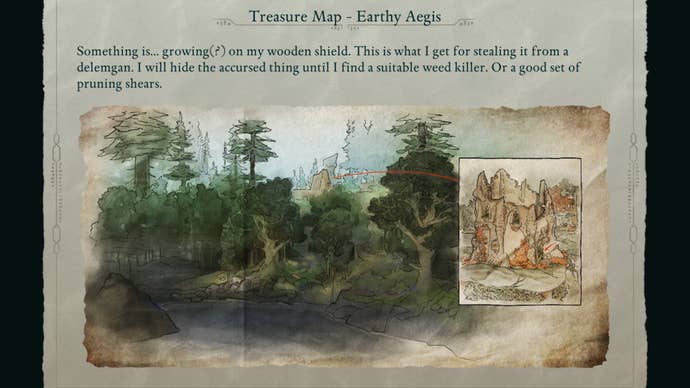
Treasure Map location: You'll have to be thoroughly exploring the Naku Tedek Grounds in southern Emerald Stair in order to find this one. Climb atop the market stalls covered with tarps and orient yourself until you can see the glowing adra in the background. A giant root will be in front of you - walk across it and jump through the hole in the structure before you to find a chest with the map.
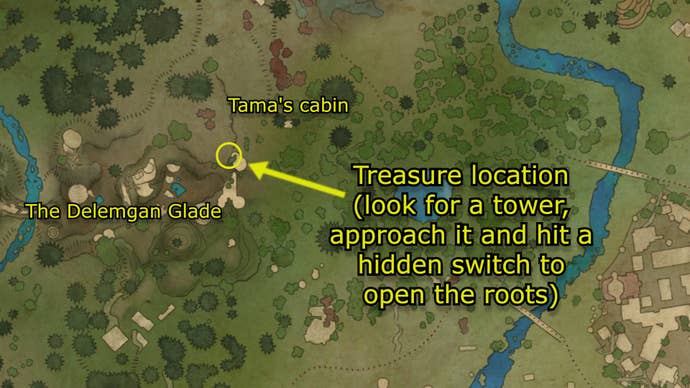
Treasure location: Go west of Tama's Cabin, to the northeast of the Delemgan Glade text that appears on your map. You'll see a small tower there that's slowly being reclaimed by nature and matches the illustration on your Treasure Map.
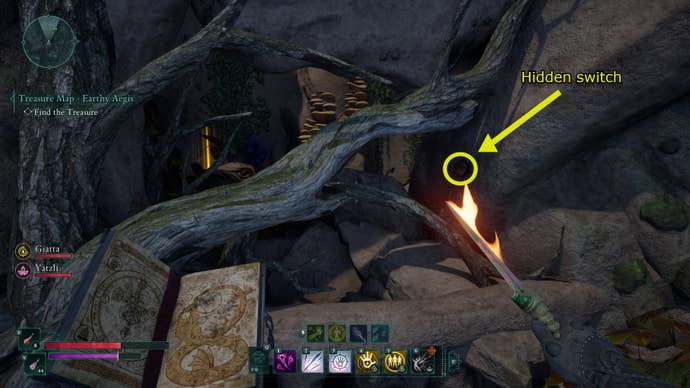
Go around the right side of the tower, being careful not to fall down. You'll see a bunch of roots covering an opening that leads to a chest. Look very carefully for a small switch that lets you open these roots. If you're playing in third-person view, like I usually do, switch to first-person for this part, since it's very hard to orient the camera in third-person view in a way that highlights the switch. Press it and the roots will go away and you can finally get your prize.
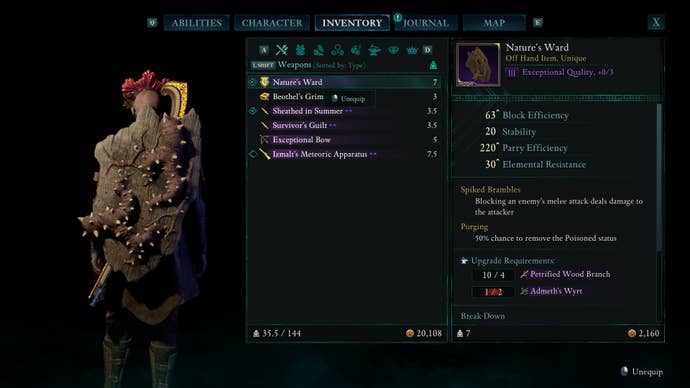
Treasure: Nature's Ward, a unique wooden shield that deals damage to an attacker whenever you block thanks to spikes sticking out of it. If I used shields more I'd gravitate towards this, since it looks rad and also gives you a 50% chance to remove Poison.
7. Shatterscarp Treasure Map: Robe of the Arcane Cheater
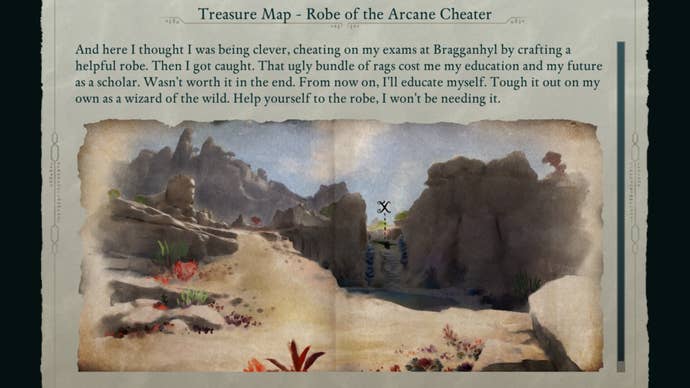
Treasure Map location: You'll need to buy this map from Ihaka, a woman who appears to be a former thief or fence and runs The Thrifty Pig, an out-of-the-way shop. You can find her shop in a cave located in the northeast stretch of the Deadfall Highlands in Shatterscarp.
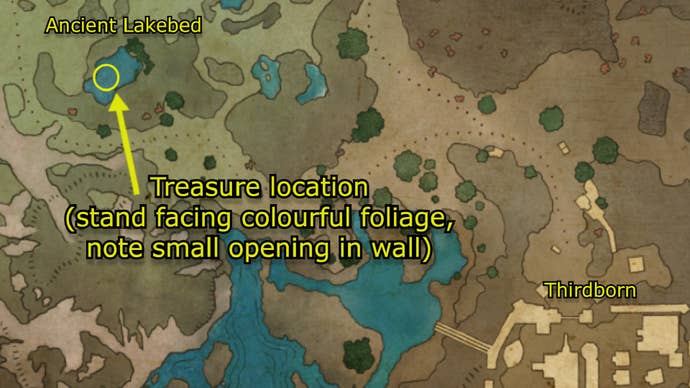
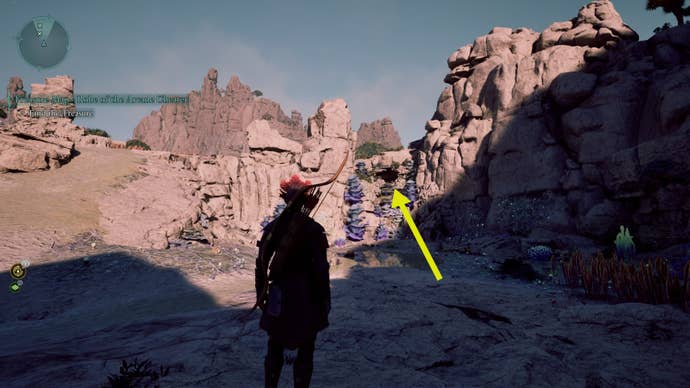
Treasure location: Go to the body of water under the Ancient Lakebed text on your map, northeast of Thirdborn. It's not really a body of water any longer, as the heat in Shatterscarp has made everything dry up. But if you stand facing the rocks that are decorated by colourful foliage, you can match your position up with the map illustration. You'll see a little opening in the wall - parkour up the rocks or jump down from the ledge above to enter a cave with a chest. (Incidentally, the Kukae Maka Bounty is also here, so if you're doing bounties you might run into this area by accident.)
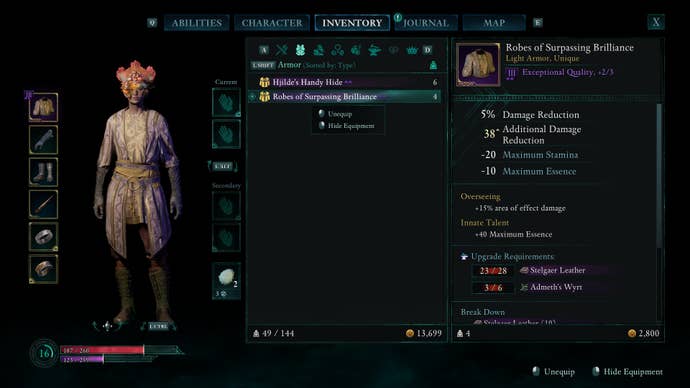
Treasure: Robes of Surpassing Brilliance, unique light armour that gives you +15% AoE damage plus +40 max Essence. Great clothing to complement some of the skills in our best Wizard abilities guide.
8. Shatterscarp Treasure Map: Seafarer's Boots
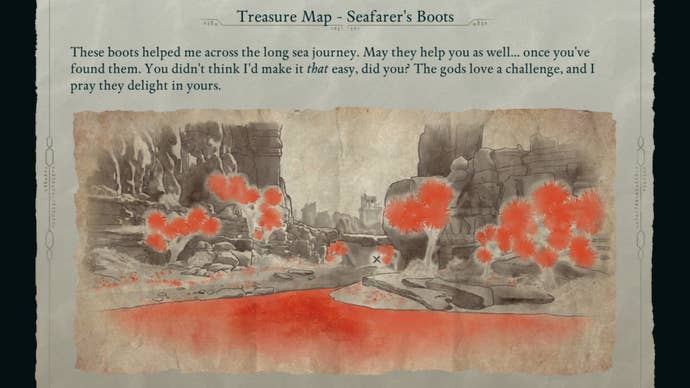
Treasure Map location: This map can be found on a cliff to the slight northeast of the gates of Thirdborn. Keep your eyes out for an Loato, an orlan NPC looking out at the horizon and standing by a picnic blanket. Examine the blanket to pick up the map.
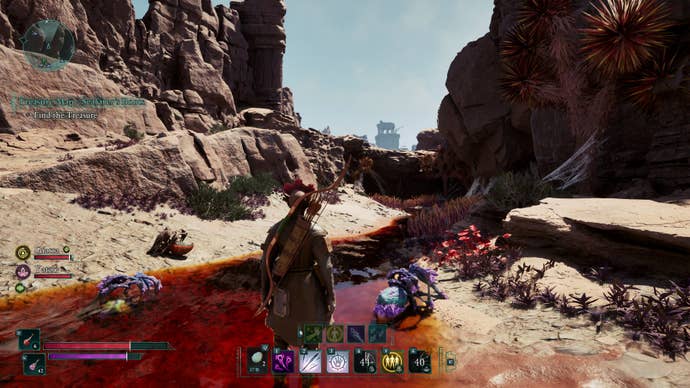
Treasure location: Go to the red riverbed to the northeast of the Sulfur Mines Basecamp in western Shatterscarp. Explore the stretch of river that sticks out east, and pay attention to the bridge as you orient yourself with the map's illustration. Go under the bridge and you'll find an alcove on your left that contains the treasure.

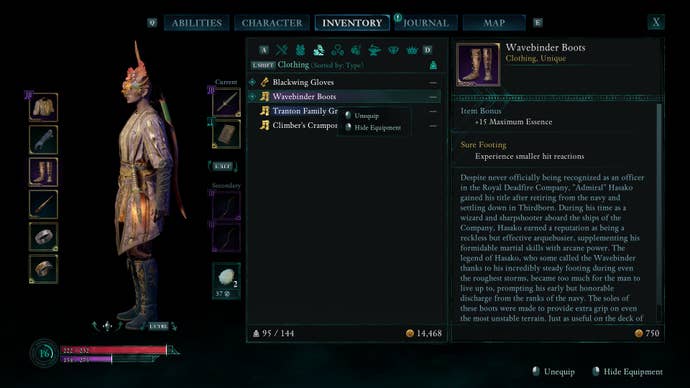
Treasure: Wavebinder Boots, unique shoes that give you +15 maximum essence and allow for smaller hit reactions. They're a decent bit of footwear for magic-users and non-melee characters.
9. Shatterscarp Treasure Map: Dead Man's Mail
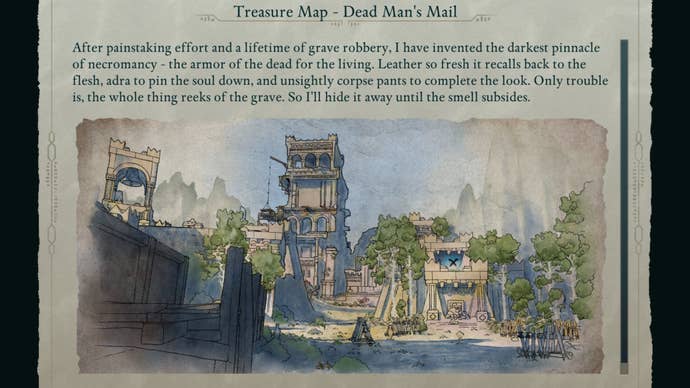
Treasure Map location: Go to eastern Shatterscarp until you reach the Great Sand Sea. Then, navigate directly to where the "S" of "Great Sand Sea" is written on your map. You'll find a tent there with a skeleton; examine it to find the Treasure Map.
Treasure location: Go north of Shark's Teeth and stand at the intersection of Shark's Teeth, the Ruined Village, and Tago's Tower. Keep an eye out for the hanging construction to re-create the illustration on the Treasure Map. Note the structure you need to climb into; there's a fallen pillar nearby that heads right on up.
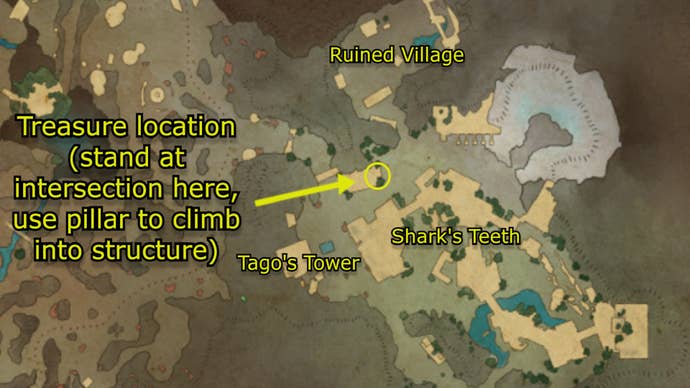
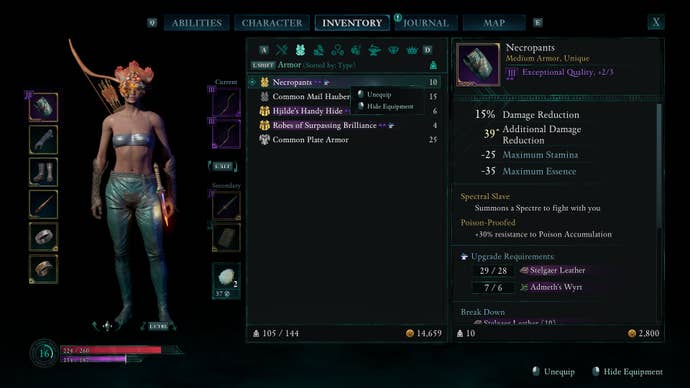
Treasure: Necropants, unique medium armour that allow you to summon a spectre and give +30% resistance to Poison accumulation. They also remove your Envoy's top and are baggy around the butt area. Supposedly they were made from skin. Creepy!
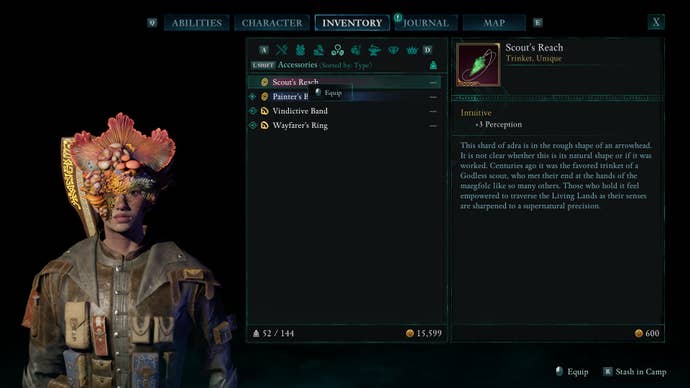
10. Galawain's Tusks Treasure Map: Ancient Arrowhead
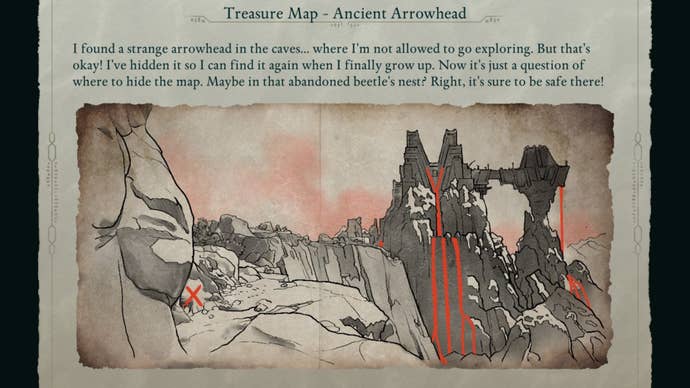
Treasure Map location: You can find this map in a cave within the Writhing Ruins, to the west of the starting area when you first enter Galawain's Tusks. Search for an opening amongst the rocks that leads down into a cavern with a giant creature skull lying in the middle of a pool of water. You'll know you're in the right place when your companions comment on the awful stench, and the Treasure Map lies on a corpse nearby. This is also where the Mater Mare Bounty is, so if you've been meaning to kill the big beetle matriarch, you may end up here.
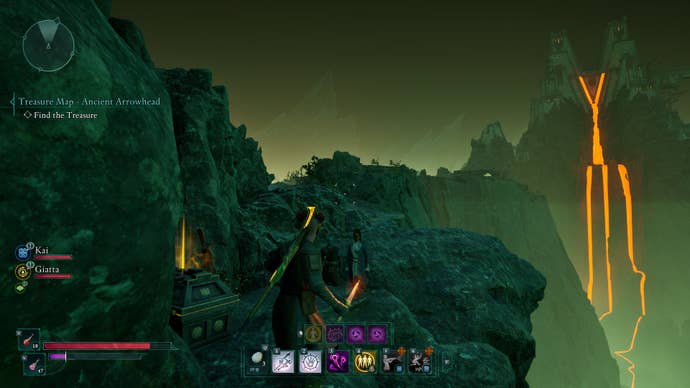
Treasure location: This treasure's hidden in plain sight, albeit on a dangerous ledge overlooking a steep fall. Go east of Warden's Rest and look at Solace Keep in the distance to match the Treasure Map's illustration. Search along the rocky ledges beneath you while being careful not to lose your step. Your treasure lies within a chest that requires 3 Lockpicks to open.

Treasure: Scout's Reach, a unique trinket that offers +3 to Perception. Not the most stunning treasure, but if you don't have any other trinkets handy it's not terrible.
11. Galawain's Tusks Treasure Map: My Loyal Shield
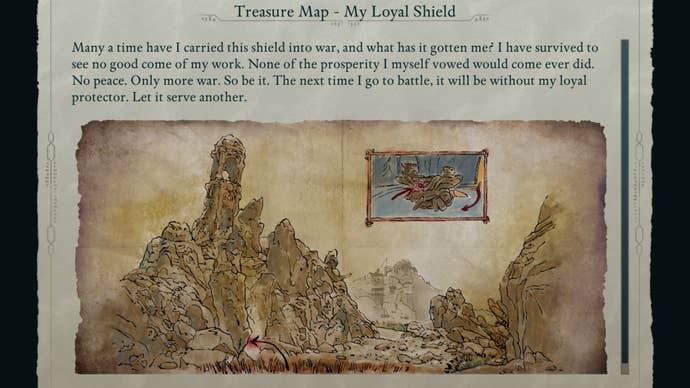
Treasure Map location: Go to the Southern Warden Tower in southern Galawain's Tusks, right above the Writhing Ruins. You can buy this Treasure Map from Stockkeeper Eberk, a merchant who sells various dwarven odds and ends.
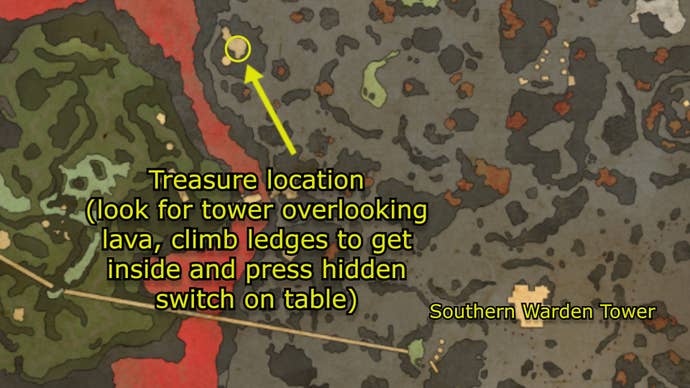
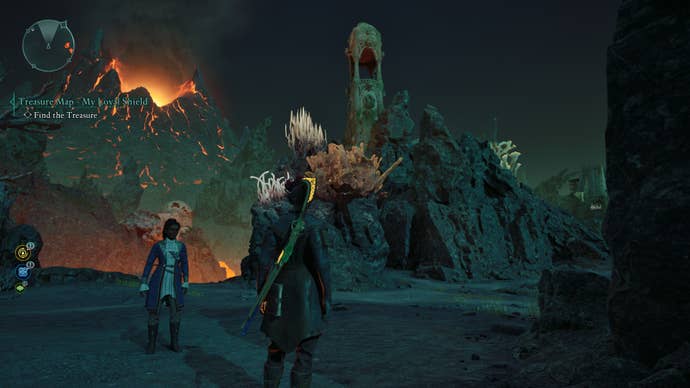
Treasure location: From the Southern Warden Tower, trek northwest until you spot a tower on a rocky structure overlooking lava that has a glowing blue interior the closer you approach. Navigate your way around to the back of the tower and climb up the ledges until you get inside. Circle around the table in the centre of the room and you'll find a secret switch. Press it (if you're in third-person mode, switch to first-person to make things easier) and this opens up a door just outside the blue-lit central interior. The treasure lies in a chest inside.
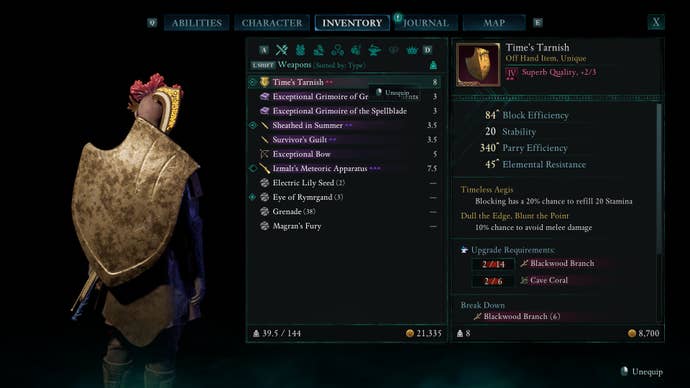
Treasure: Time's Tarnish, a unique shield that restores 20% of Stamina as you block and offers a 10% chance to avoid melee damage. A nice protective piece, especially in this tough endgame region.
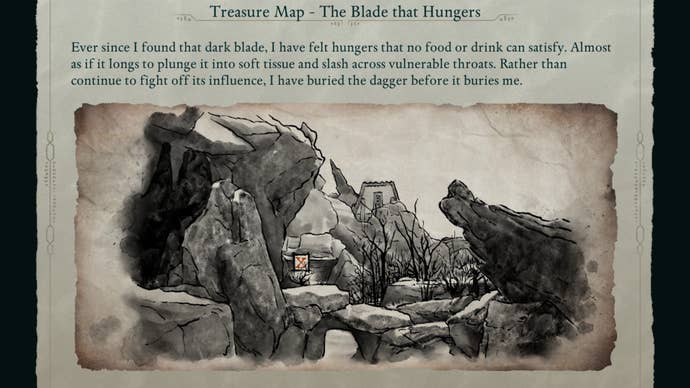
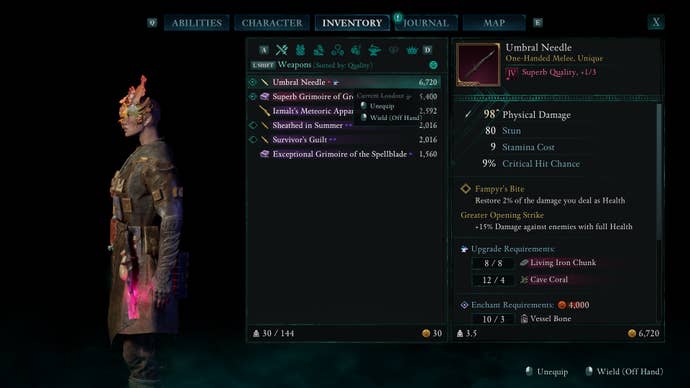
12. Galawain's Tusks Treasure Map: The Blade That Hungers
Treasure Map location: Go to the top floor of Solace Keep (take the stairs, not the lift that leads to the Council chamber) and buy the map from Bulti, one of the keep's quartermasters.
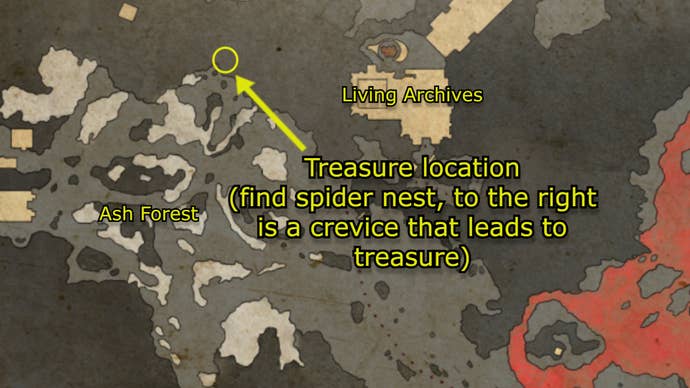
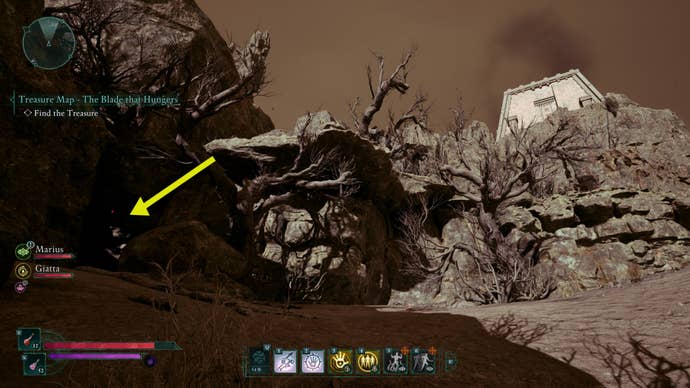
Treasure location: Go to the far north beyond the Ash Forest and west of the Living Archives until you come across a group of spiders hanging out in the rocky cliffs that border the contours of Galawain's Tusks. To the right of their nest you'll spot a small crevice that you can fit through; go inside and follow the path until you reach the chest.
Treasure: Umbral Needle, a unique dagger that restores 2% of the damage you deal as health and does +15% damage against enemies with full health. If you're a dagger user, this is without a doubt one of the best knives in the game.
That finishes our guide to the many hidden Treasure Maps of Avowed! If you'd like to make yourself look pretty with all of this cool gear, our guide on how to transmogrify is worth a read. Our Avowed beginner's guide and tips on dealing Elemental and Explosive damage will also make your journey through the Living Lands all the easier. And if you're keen on figuring out the skillsets of your four trusty companions, be sure to read our guides on the best abilities for Kai, Marius, Giatta, and Yatzli!