Doom: The Dark Ages - All Village Of Khalim secrets (Chapter 1)
Uncover all 6 secret area locations hidden in Chapter 1


Looking for all the secret areas in Chapter 1 of Doom: The Dark Ages? 2025's new techno-medieval Doom campaign is divided into 22 chapters, with all players starting in the Village Of Khalim as they get to grips with the Slayer's destructive powers once more. All of Doom's chapters have various hidden secrets housing important collectibles and other goodies, and Chapter 1 is no exception, with 6 secret areas in total to discover.
We've spent hours carefully plotting the quickest path through the Village Of Khalim to find all 6 secrets within. In this guide, you can find a detailed map of all secret areas, as well as descriptions of each secret location, the solution to each puzzle, and the hidden rewards you'll find inside each one. We've designed this walkthrough to be your ideal companion as you blitz through Chapter 1 of Doom: The Dark Ages at breakneck speed. So if you want to ensure you don't miss a single thing, read on for everything you need to find all 6 secrets in Village Of Khalim.
| Find a different chapter's secrets! | |
|---|---|
| Previous: None | Next: Chapter 2 |
| Click to show all chapters | |
| Chapter 1 | Chapter 12 |
| Chapter 2 | Chapter 13 (no secrets) |
| Chapter 3 (no secrets) | Chapter 14 |
| Chapter 4 | Chapter 15 |
| Chapter 5 | Chapter 16 |
| Chapter 6 | Chapter 17 |
| Chapter 7 | Chapter 18 |
| Chapter 8 | Chapter 19 |
| Chapter 9 | Chapter 20 |
| Chapter 10 | Chapter 21 (no secrets) |
| Chapter 11 | Chapter 22 |
| Doom: The Dark Ages secrets walkthrough hub | |
All Village Of Khalim secrets (Chapter 1)

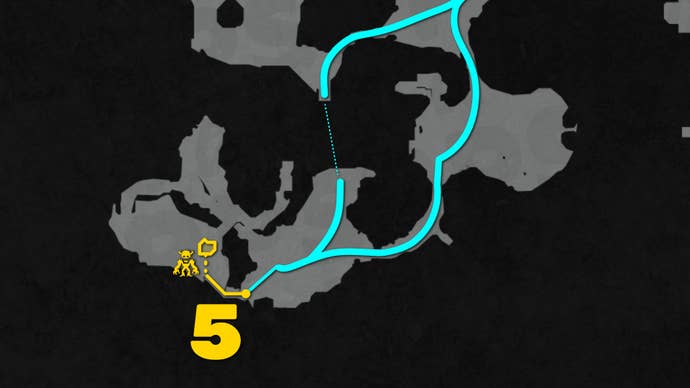
Here's where you can find all 6 secrets in Village Of Khalim, the first chapter of Doom: The Dark Ages (as well as a bonus collectible area), and tick each of them off the list once you've discovered them:
| Secret | Location | Reward | Found? |
|---|---|---|---|
| Secret 1 | Breakable wall past Gauntlet unlock | Life Sigil | |
| "Point Of No Return" 1 | |||
| Secret 2 | Blue Key door | Imp Toy | |
| "Point Of No Return" 2 | |||
| Secret 3 | Secret Key door | Life Sigil | |
| Secret 4 | Hidden cave by locked gate | Nightmare skin (Shotgun) | |
| Secret 5 | Lower ledge near Shredder unlock | Soldier Toy | |
| Bonus 1 | On the ledge behind the far back Demonic Portal | Doom Slayer Codex | |
| Secret 6 | Up a climbable wall on the beach | Village Of Khalim Codex | |
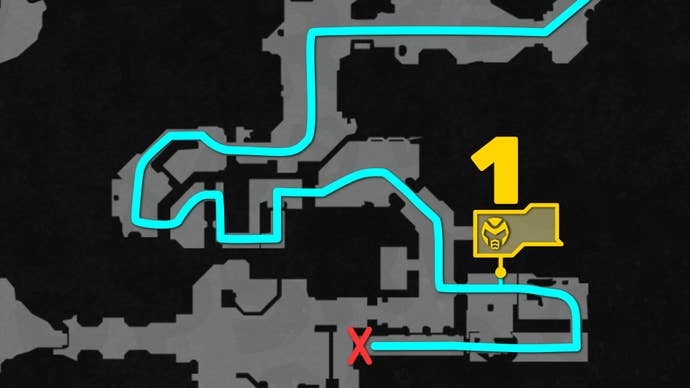
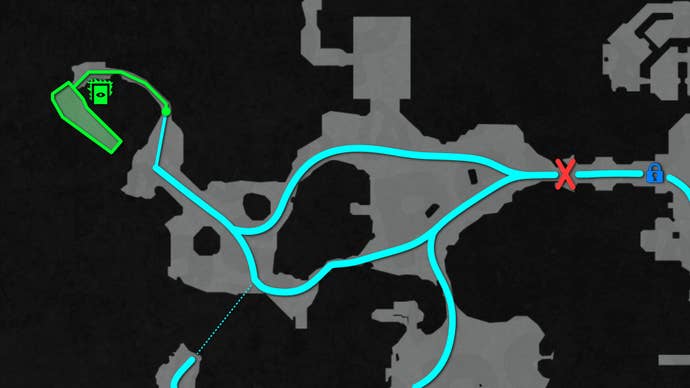
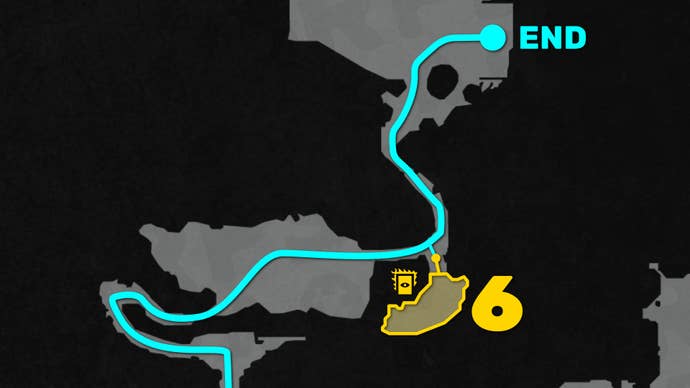
You can consult the map above for a simple step-by-step guide through the level where you can easily find all 6 secrets along the way. For more information on the location of each secret area and how to reach them, read on for a full walkthrough of all Chapter 1's secrets.
Secret 1: Breakable wall past Gauntlet unlock (Life Sigil)
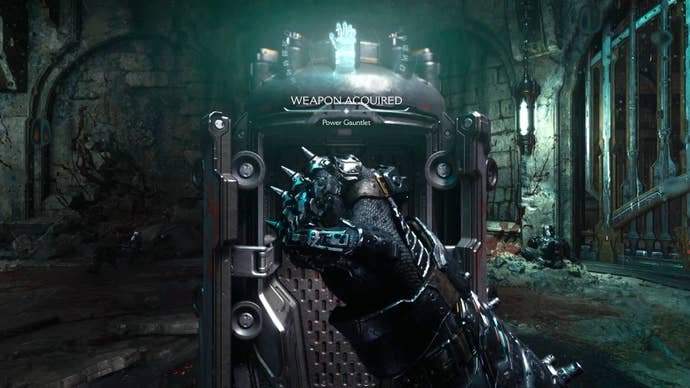

- Location: In the burning room just beyond where you find the Power Gauntlet.
- Solution: Shield Charge through the breakable wall section.
- Reward: Life Sigil
To find this first secret, progress linearly through the chapter until you unlock the Power Gauntlet melee weapon (you can't miss it). Proceed through the next doorway into a courtyard with four persistent "melee charge" Gauntlet pickups. Once you've killed the demons, head into the burning indoor room, and you'll see a breakable wooden wall on your left.
Break through the wall with a Shield Charge: aim at it with RMB until you're locked onto the wall and the reticle turns red; then click LMB to Shield Charge through into the secret area. In this secret area you'll find your first Life Sigil, as well as an armor pickup.
Secret 2: Blue Key door (Toy)


- Location: In the left-hand alleyway just after the first "Point Of No Return".
- Solution: Collect the Blue Key from the nearby cultist room, then return to this door.
- Reward: "Imp" Toy
The next Chapter 1 secret is beyond the first "Point Of No Return". Once you've jumped down and cleared the area of that initial wave of demons, you'll see a large gate which you need the Blue Key to unlock. Follow the quest marker to the adjacent demon-filled alleyway on your left. In this alleyway, there's another much smaller door barred by the Blue Key. This is the secret area. So all you need is to find the Blue Key, then return to this point!
The Blue Key can't be missed; it's just a little bit beyond where you are currently. Shield Charge through the breakable wall and follow this route through another wave of demons and a fight with a Pinky Rider. Climb the wall beyond the Pinky Rider into a room filled with praying cultists (who you can kill to get an achievement, by the way). The Blue Key is found at the end of this room.
Now you can retrace your steps and open the smaller of the two Blue Key doors to access the secret area beyond, and earn your first Demon Toy (an Imp) for your trouble!
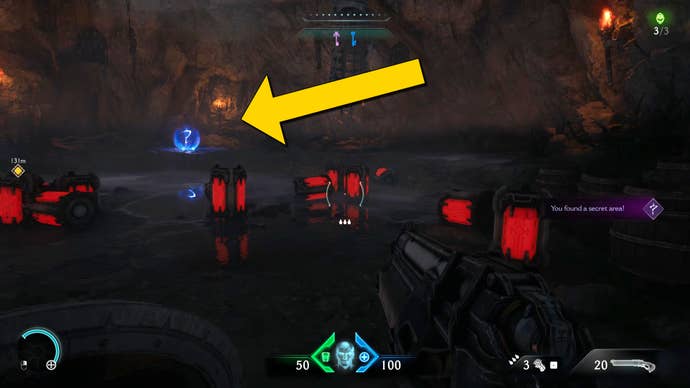
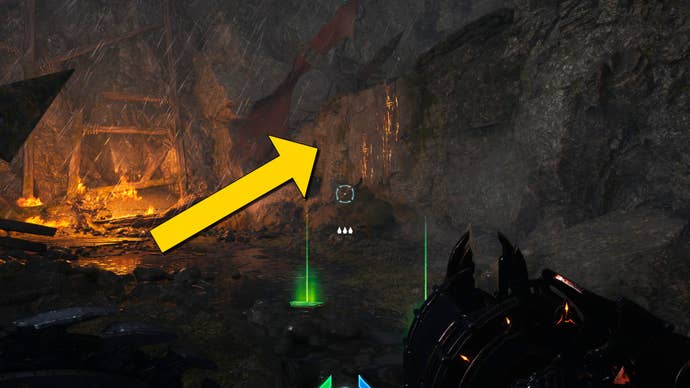
Secret 3: Secret Key door (Life Sigil)


- Location: Next to the first of the four Demonic Portals.
- Solution: Collect the Secret Key from the upper cliffs in the area beyond.
- Reward: Life Sigil
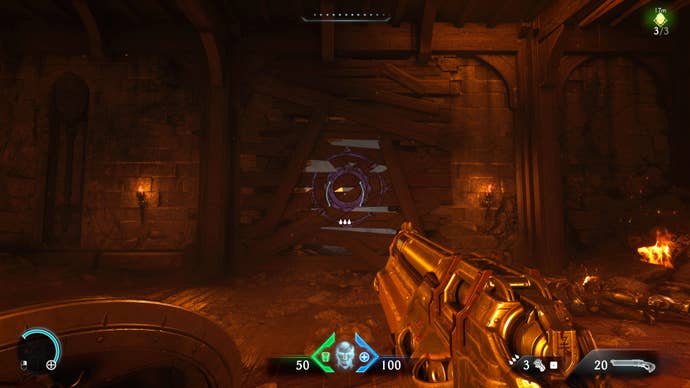
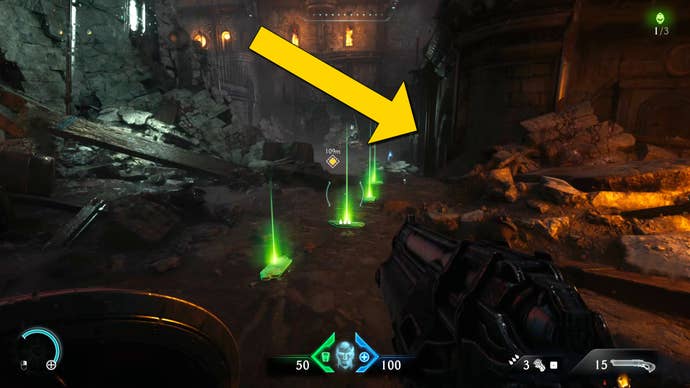
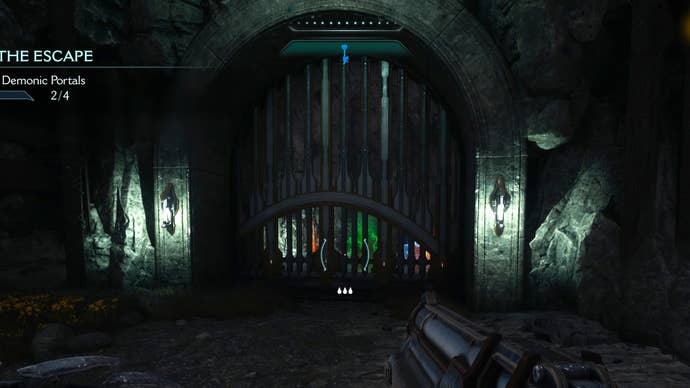
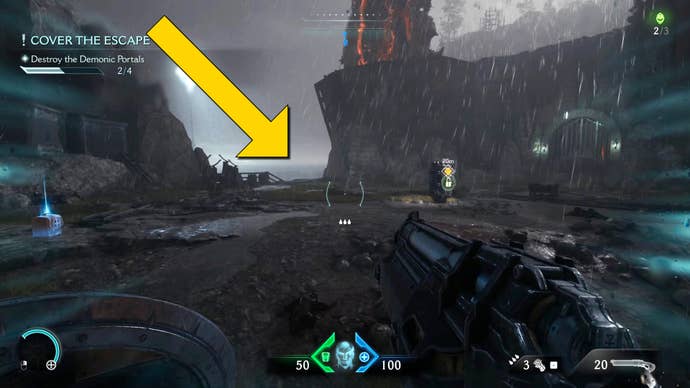
It's pretty much impossible to miss this secret area, as it's guarded by a door with a glowing purple seal indicating that you need to find the "Secret Key" first. The door in question is in the arena just beyond the Blue Key gate, next to the first of the four Demonic Portals you must destroy.
The Secret Key is atop the cliffs in the area beyond - you can access it either by taking the left-most path all the way around to the Shredder unlock, or walk down the path immediately left of the Secret Key door, and use the jump pad to reach that same area. From there, head up the cliff path and destroy the next Demonic Portal, then cross the wooden bridge and take the right-hand path to collect the Secret Key on the edge of the cliff.
Once you've done that, you can return to the Secret Key door to open it, and collect the Life Sigil housed within this secret area.
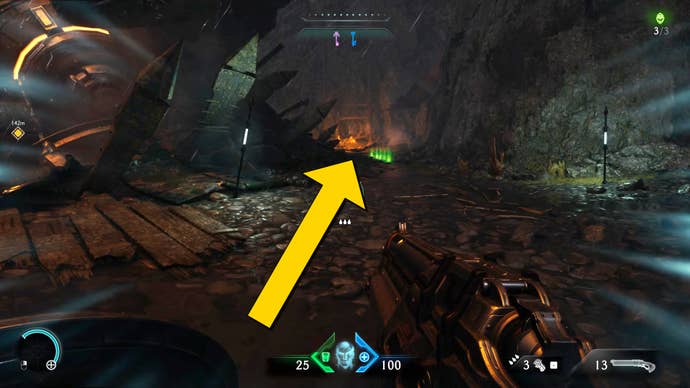
Secret 4: Hidden cave by locked gate (Skin)
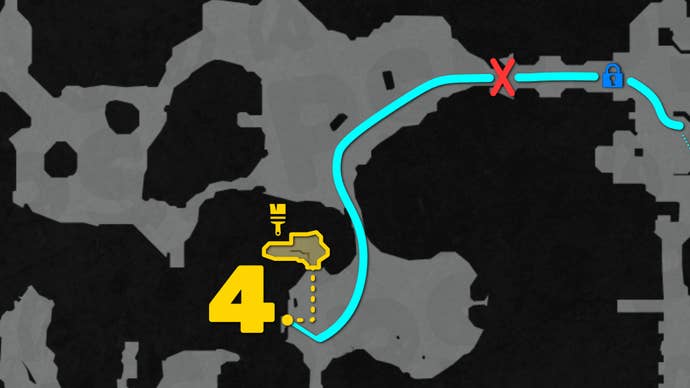
- Location: By the locked gate in the left-hand Demonic Portal area.
- Solution: Drop off the cliff edge by the river, and grab the ledge below.
- Reward: "Nightmare" Skin for Combat Shotgun
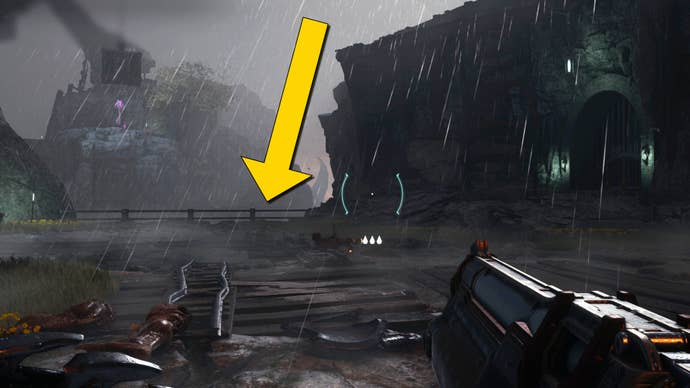
To reach this secret, progress to the section of Chapter 1 where your task is to destroy the 4 Demonic Portals. The first is just beyond the Blue Key gate. After that, take the leftmost route and destroy the next Demonic Portal.
In this area, there's a locked gate you can't get through, with various goodies behind it. Next to this gate is a cliff edge that overlooks a river. Jump off the cliff edge but keep as close to the cliff wall as possible - there's a ledge lower down which you can grab onto.
This ledge leads into the third secret area: a small cave littered with explosives, containing a collectible Skin for your Combat Shotgun. As you approach, the Toy will be locked off and a few demons will spawn, but you can kill them all with a single shot to any of the handily placed explosives.
After that, pick up your "Nightmare" Combat Shotgun Skin, and then use the bounce pad in the next room to reach the other side of that locked gate you saw earlier. Collect the various pickups if you wish, and approach the gate to unlock it and continue on your journey.
Secret 5: Lower ledge near Shredder unlock (Toy)
- Location: In the third Demonic Portal area, where you unlock the Shredder weapon.
- Solution: Drop off the edge overlooking the water and follow the lower path.
- Reward: "Soldier" Toy
From the left-most of the four Demonic Portals, continue on into the adjoining corridor, which fills with Imps as you enter. Dispatch the Imps, then head into the next area to find your new weapon: the Rail Spike Shredder.
Kill the demons that appear after picking up the Shredder, and then return to the Shredder pickup point. Very nearby is a section of broken fence that separates you from the sea. Drop down here onto the ledge below, and follow the path around to the fifth secret area containing the "Soldier" Toy and various more ephemeral pickups.
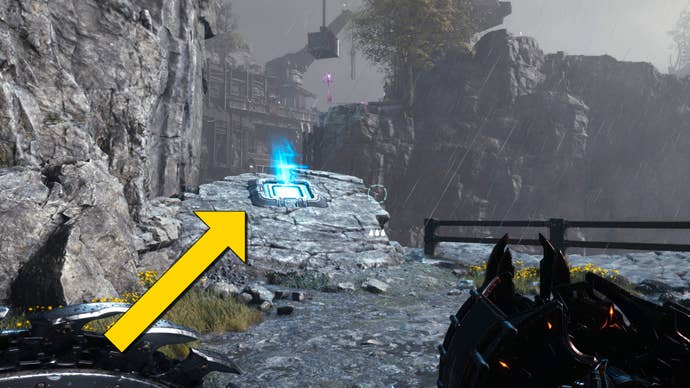
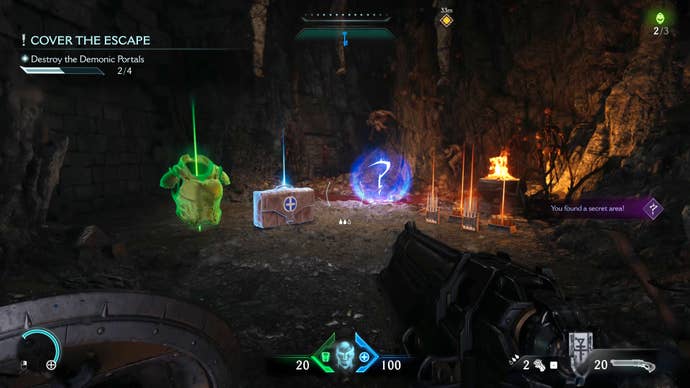
Bonus: "Doom Slayer" Codex

- Location: On the ledge behind the far back Demonic Portal.
- Solution: Scale the climbable wall to the right of the Portal.
- Reward: "Doom Slayer" Codex
There's one collectible which isn't in any of Chapter 1's "secret" areas. But while it isn't technically a secret, we thought we should include it for any of you who don't want to miss a thing in your playthrough of "Village Of Khalim".
The Doom Slayer Codex is located behind the far back Demonic Portal - the one whose arena lies behind the first Demonic Portal and the Secret Key door. Once you've killed the demons in this area, simply head to the back of the arena and around the right-hand path. This path loops up to an overlook where you can collect the Doom Slayer Codex.
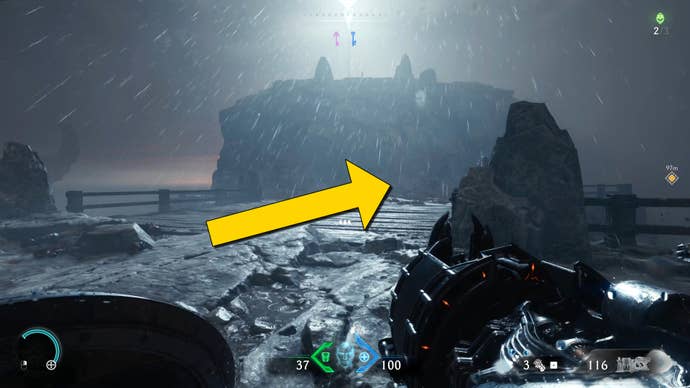
Secret 6: Up a climbable wall on the beach (Codex)
- Location: Just beyond the beach battlefield near the end of Chapter 1.
- Solution: Scale the climbable wall on your right as you exit the area.
- Reward: "Village Of Khalim" Codex
The final secret area of Chapter 1 is quite easy to find. Progress through the chapter until you arrive on the beach, with the Titan and Dragon fighting in the distance. Drop down onto the beach and kill all the demons there.
As you exit the area through the line of green armour pickups, turn right instead of left and you'll see a short climbable wall. Scale it to find the secret area, where you can pick up the "Village Of Khalim" Codex entry and round off all the secrets of Chapter 1.
That wraps up our walkthrough of all the secrets and secret areas in "Village Of Khalim", Chapter 1 of Doom: The Dark Ages. If you're looking to continue your blazing path of destruction through the campaign, then check out our next walkthrough of all the Chapter 2 secrets!