Monster Hunter Wilds: Chapter 4-3 walkthrough
You've fought Frenzied monsters, how about another variant in Chapter 4-3?

Not sure what Hunter Rank in Monster Hunter Wilds' Chapter 4-3 you need to reach? Our walkthrough explains what rank you need to reach to complete Touring History while also providing tips on each monster fight ahead.
As long as you complete side missions and optional quests while grinding, you'll quickly increase your Hunter Rank. And then you can take on another new variant.

Our walkthrough hub links to every Monster Hunter Wilds chapter guide. You can also get to each Chapter 4 guide via the below links:
- Chapter 4-1
- Chapter 4-2
- Chapter 4-3
Touring History walkthrough
Touring History objectives
- Investigate the regions and raise your HR
Continuing your monster grind, all you need to do here is reach Hunter Rank 20 to progress. Once you reach that rank, Alma will tell you to meet with Olivia at the Ruins of Wyveria Base Camp.
To Wyvern's Rest walkthrough
To Wyvern's Rest objectives
- Talk to Olivia at the Ruins of Wyveria
Speaking with Olivia reveals a Lala Barina in the region for unknown reasons. Without saying much, Olivia states that this variant is stronger than usual. Once your conversation ends, the next main mission starts where you can begin to prepare for your next hunt.
Wyvern Sparks and Rose Thorns walkthrough
Wyvern Sparks and Rose Thorns objectives
- Talk to Olivia at the Ruins of Wyveria
- Follow the Lala Barina [???] traces
- Examine the traces
- Hunt the Guardian Fulgur Anjanath
- Hunt the Lala Barina [???]
The name for this main mission is fitting as you'll be dealing with two monsters simultaneously. One of them you've fought before and one you haven't. The good thing is that they separate early on, making it more of a one-on-one battle. Preparation for this hunt includes Nulberries, traps, Tranq Bombs if you want to capture, Flash Pods, and any other useful consumables.
The first monster you'll fight is vulnerable to Water, Ice and Dragon. Whereas the second monster is vulnerable to only Fire. You can either bring two weapons to fit each situation or not worry too much. I didn't use elements on the majority of my weapons throughout Monster Hunter Wilds and handled things just fine.
Speak with Olivia when you're ready and continue the objectives until your fight with the Guardian Fulgur Anjanath. Those of you who played the Monster Hunter World expansion Iceborne may remember this variant. Even though it's got another variant on top of it now.
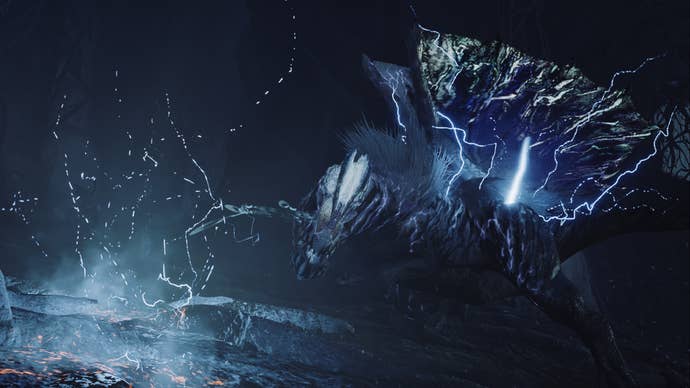
Tips for the Guardian Fulgur Anjanath fight

When your encounter first starts, it'll seem like you have to fight both monsters, but this changes after a brief turf war. Olivia will chase after the Lala Barina and your focus becomes the Guardian Fulgur Anjanath. Since this variant is also a guardian, they'll have crystal walls you can blow up with elemental slinger ammo. However, since this is the Iceborne variant, the Anjanath is full of electricity and can blow them up too.
Since the Anjanath is a bit of T-Rex, they tend to throw their head and body around for most attacks. This telegraphs certain attacks where they'll pull their head back before charging in. And as such, being in front of the Anjanath almost always means you're in danger. In addition to warning you with their head movements, this guardian also has the high-pitched ringing sound for many attacks.
The best positioning will typically be to their side and behind them. You're not safe from every attack since they can throw their body at you. But, this makes it harder for the Anjanath to shoot electric projectiles at you or chomp down. If you create a gap between you two, they may lunge through the air toward you, exploding on landing.
Mounting and traps are always helpful if you're struggling to create wounds or opportunities to deal damage. You'll occasionally come across useful endemic life and traps as they flee to other zones. When they do, you may see them absorb energy from the ground to get their electricity back. This is an opening to beat them up.
Once you've slain or captured the Guardian Fulgur Anjanath, catch up with Olivia to fight the special Lala Barina. Continue reading for tips if you need them.
Tips for the Lala Barina [???] fight

Your fight with the special Lala Barina will likely be shorter than the Anjanath since Olivia has been fighting them. You may have even noticed getting loot as parts of the Lala Barina broke.
Similar to my Chapter 4-2 walkthrough, I'll run through quick tips since this isn't our first time fighting the Lala Barina.
- Evade the floating florets to avoid paralysis.
- Aim for their tail weak point, breakable petals, and breakable claws.
- The legs are easiest to hit, so you'll likely create wounds on them.
- If they flee to another area, you may catch them sleeping. You can use explosive barrels for a deadly surprise.
- Utilise your environment using Great Thunderbugs, slinger ammo, Vine Traps, etc.
- If you're struggling to keep up with Lala Barina's mobility, use traps.
Completing your hunt leads to a cutscene finishing Chapter 4-3 alongside the main mission, Wyvern Sparks and Rose Thorns. You'll also gain Artian parts from completing this mission, which the game tells you about afterward. For a quick explainer, Tempered Monsters will now appear in your environment. Relevant quests will give you Artian materials that can then be made into Artian Weapons.
Now that you're done with our Chapter 4-3 walkthrough, make your way to our next Monster Hunter Wilds Chapter 5-1 guide. Or you can return to the walkthrough hub for many of our guides.
← Back to Chapter 4.2 Walkthrough
→ Continue to Chapter 5.1 Walkthrough